|
Frequently Asked Questions
Environment Meters
Where should I place the environment monitor for best accuracy?
What is barometric pressure and why measure it?
What is relative humidity (RH)?
Does the ATE-9382 compensate for temperature when measuring humidity or pressure?
Does the ATE-9382 have an alarm or trend display?
How to switch between measurement units?
What are the main features of the ATE-9382?
What’s the difference between ATE-2530 and ATE-2532?
How to select the required measurement unit when operating AKTAKOM ATT-2590 thermometer?
How to switch on the backlight of AKTAKOM ATT-2590 thermometer?
How to deactivate auto power off function when operating AKTAKOM ATT-2590 thermometer?
Does Aktakom ATE-5035/ATE-5035BT datalogger have Auto power off function?
How to set the date and time for Aktakom ATE-5035/ATE-5035BT datalogger?
How to start and finish datalogging when operating Aktakom ATE-5035/ATE-5035BT Humidity/Temperature Meter?
Does Aktakom ATE-1093 anemometer have auto power off function?
Can I hold the current data (Air Velocity/Air Flow) when operating Aktakom ATE-1093 anemometer?
How to change the temperature unit when using Aktakom ATE-5035/ATE-5035BT humidity/temperature meter?
Does AKTAKOM ATT-1004 have low battery charge indication?
What other capabilities does AKTAKOM ATT-9002 Vibration meter has?
Where can I check the sample time when using AKTAKOM ATT-8509?
How to clean the memory space when operating AKTAKOM ATT-5809?
How to replace the battery of AKTAKOM ATT-1508 Light meter and when?
How to save data from the SD card to my PC when operating AKTAKOM ATE-1537 light meter?
What should I do if RPM is low when operating AKTAKOM ATT-6000 tachometer?
How to save data from the SD card to the computer when operating AKTAKOM ATE-9380 Thermometer monitor?
How to save data from SD card to the computer when using AKTAKOM ATE-9030 (ATE-9030BT) Sound level meter?
How to check sampling time information when operating AKTAKOM ATE-9030 (ATE-9030BT) Sound level meter?
How to set emissivity when using ATE-2523?
How to measure temperature with ATE-2523 pyrometer?
How to select the required temperature measurement unit when using ATE-2523?
How to activate and deactivate auto turn-off of ATE-1033 or ATE-1033BT (ATE-1034, ATE-1034BT)?
How to switch on or off the beep when operating ATE-1033 or ATE-1033BT (ATE-1034, ATE-1034BT)?
How to switch on and off the display backlight of ATE-1033 or ATE-1033BT (ATE-1034, ATE-1034BT)?
How to check Android USB-host functions using «USB Host Diagnostics»?
My Android device doesn’t work with AKTAKOM ACE-1025 (ACE-1026) and can’t get data from the device connected to it. What is the reason?
What is the difference between ACE-1025 and ACE-1026?
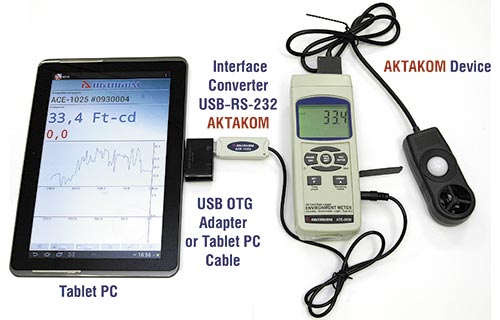
How to use ACE-1025 and ACE-1026 converters with my tabled PC?
How to record data (Max., Min. reading) when using ATE-8702 magnetic meter?
How to hold data when using ATE-8702 magnetic meter?
How to measure AC and DC magnetic fields using ATE-8702 magnetic meter?
How to check if the driver is properly installed?
How to collect your recorder data using Datalogger memory card?
How to connect your ATE-9051 to your computer?
Where should I place the environment monitor for best accuracy? |
-
Mount at eye level away from direct sunlight or heat sources.
-
Avoid proximity to vents, fans, or humidifiers.
-
Allow at least 15–20 minutes to stabilize after relocation before reading data.
Up
|
What is barometric pressure and why measure it? |
Barometric pressure (atmospheric pressure) is the weight of the air above a given area. Monitoring it helps track weather changes and maintain controlled environmental conditions in labs, manufacturing, or calibration facilities.
Up
|
What is relative humidity (RH)? |
Relative Humidity (RH) expresses how much water vapor is in the air compared to the maximum amount the air can hold at a given temperature. For example, 50% RH means the air contains half the moisture it could hold before reaching saturation.
Up
|
Does the ATE-9382 compensate for temperature when measuring humidity or pressure? |
Yes. The sensor automatically performs temperature compensation to maintain accurate humidity and pressure readings across the measurement range.
Up
|
Does the ATE-9382 have an alarm or trend display? |
Yes.
It includes visual trend indicators that show whether temperature, humidity, or pressure are rising, steady, or falling, and some models feature audible alarms for custom thresholds.
Up
|
How to switch between measurement units? |
When ATE-9382 is not in the Datalogger mode, press the "SET" button for at least 2 seconds. ATE-9382 will enter the "Setting" mode. Release the "SET" button. Then press the "SET" button to cycle through settings menu.
- When display shows "t-CF", press "▲" or "▼" button to select temperature unit: °C or °F.
- When display shows "bAro", press "▲" or "▼" button to select barometer unit: hPA, -HG, InHg.
Press the "Enter" button to save settings.
Up
|
What are the main features of the ATE-9382? |
-
Triple measurement display: Temperature, Humidity, and Barometric Pressure
-
Large, easy-to-read LCD screen with real-time values
-
Data hold, max/min, and trend indicators
-
Selectable pressure units (hPa, mmHg, inHg)
-
Comfort level indicator (for temperature/humidity comfort zones)
-
Wall-mount or desktop use
-
Battery and USB power options (model dependent)
Up
|
What’s the difference between ATE-2530 and ATE-2532? |
|
ATE-2530 The emissivity is Fixed at 0.95.
ATE-2532 The emissivity is adjustable.
Up
|
How to select the required measurement unit when operating AKTAKOM ATT-2590 thermometer? |
|
To switch between °C and °F units you need to press UNIT button on the front panel of AKTAKOM ATT-2590 thermometer. The selected unit will be shown on the display.
Up
|
How to switch on the backlight of AKTAKOM ATT-2590 thermometer? |
-
To switch on the backlight of AKTAKOM ATT-2590 thermometer press the following button -
 and keep it pressed for about 1 second and keep it pressed for about 1 second
-
The backlight will be on, at the same time you will see the relative indicator in the top right corner of the display
-
To switch the backlight off press the same button again and keep it pressed for about 1 second. The symbol in the top right corner will disappear.
Up
|
How to deactivate auto power off function when operating AKTAKOM ATT-2590 thermometer? |
Auto power off function is active on default. If you press no buttons of AKTAKOM ATT-2590 thermometer within 20 minutes (for contact measurement mode) or 20 seconds (for contactless mode) the device automatically powers off.
-
To deactivate auto power off function switch off the device first. Therefore press TYPE/ON/OFF button and keep it pressed for 1-2 seconds
-
Keeping LASER button pressed switch on the device by pressing TYPE/ON/OFF button. All of the symbols will be displayed at the same time.
-
At this stage auto power off function is considered deactivated.
Up
|
Does Aktakom ATE-5035/ATE-5035BT datalogger have Auto power off function? |
Yes, it has. When the lower display shows "PoFF" you need to use ▲ or ▼ button to select the upper value to "yes" or "no"
“Yes” will activate Auto Power Off management. “No” will deactivate this function.
After you select the upper text to "yes" or "no", press Enter Button to save the settings.
Up
|
How to set the date and time for Aktakom ATE-5035/ATE-5035BT datalogger? |
When the lower display shows “Date” press Enter Button once, use ▲ or ▼ buttons to adjust the value (the setting starts from Year). After the desired value is set, press Enter Button again and you will start the next value adjustment. Next values to adjust will be Month, then Date, Hour, Minute and Second.
After setting all of the values (Year, Month, Date, Hour, Minute, Second), the screen will jump to "SD card Decimal character" setting.
Note: After the time value is set, the internal clock will run precisely even if the device powers off but only if the battery is under normal condition (not low).
Up
|
How to start and finish datalogging when operating Aktakom ATE-5035/ATE-5035BT Humidity/Temperature Meter? |
The operation can be in Auto and manual modes.
For Auto Datalogging (set the sampling time: ≥ 1 second):
- Press REC Button once, the LCD will show the text REC, then press Logger button, REC will flash, at the same time the measuring data along with the time information will be saved into the memory circuit.
- While operating the Datalogger function, if you press Logger Button once it will pause the Datalogger function (stop to save the measuring data into the memory circuit temporally). In the same time REC will stop flashing.
- When you pause the Datalogger, press and hold REC Button for at least two seconds, REC indication will disappear and finish the Datalogger.
For Manual Datalogging (sampling time: 0):
- Press REC Button once, the LCD will show REC text, then press Logger Button once, REC will flash once and the Beeper will sound once, at the same time the measuring data along with the time information will be saved into the memory circuit. The lower Display will show the Position (Location) no. and the data will be saved into the SD card.
- Press and hold REC Button for at least two seconds, REC indication will disappear and finish the Datalogger.
Up
|
Does Aktakom ATE-1093 anemometer have auto power off function? |
Yes, it does. To prolong the battery life Aktakom ATE-1093 anemometer automatically turns off in 20 minutes. To deactivate this feature follow the below steps:
- Turn off the anemometer.
- Press and hold Backlight key while turning the meter on.
- “dis APO” will appear on the display. Auto power off feature can be considered deactivated.
Note that Auto power off is re-enabled each time the anemometer is turned on.
Also note that Auto power off function is disabled in CFM/CMM or Average mode.
Up
|
Can I hold the current data (Air Velocity/Air Flow) when operating Aktakom ATE-1093 anemometer? |
Yes, therefore while taking measurements press “HOLD” button to freeze the air velocity/air flow reading. HOLD indicator will appear in the bottom of the LCD.
To return to the normal operation you will need to press “HOLD” again.
Up
|
How to change the temperature unit when using Aktakom ATE-5035/ATE-5035BT humidity/temperature meter? |
- Before changing the measurement unit you need to deactivate 2 functions: “Hold of the current value” and “Max/Min value”.
- Keep “SET” button pressed for minimum 2 sec. until you see “Code” symbol at the bottom of the LCD.
- Release “SET” button, you will see “1000” displayed at the top.
- After you see both “Code” and “1000” symbols press “ENTER” to activate the function of the measurement unit change. “ESC” button will return the device to the standard measurement mode.
- Using “SET” button set “°F”. Then press “FUNCTION” button to change the measurement unit. If you see “0” displayed at the top after you pressed “FUNCTION” the measurement unit will be “°C”. If after pressing “FUNCTION” there is “1” symbol displayed that means the measurement unit will be “°F”.
- After you set the required measurement unit press “ENTER” in order to confirm and save the setting. “ESC” button will return the device to the initial state.
Up
|
Does AKTAKOM ATT-1004 have low battery charge indication? |
Yes, it does. If the left corner of the LCD displays "LBT" that means it is necessary to replace the battery.
However measurement may still be taken for several hours after low battery indicator appears before the instrument becomes inaccurate.
To replace the battery:
- Slide the battery cover away from the instrument and remove the battery.
- Install 1.5 V AAA (UM-4) battery x 6 PCs. After you install the batteries reinstate the battery cover.
Up
|
What other capabilities does AKTAKOM ATT-9002 Vibration meter has? |
ATT-9002 has a built-in auto switch off function that saves the battery life. In case there are no buttons pressed for about 10 minutes the device will be switched off automatically.
To deactivate this function select memory record function during the measurement process by pressing Record button.
Up
|
Where can I check the sample time when using AKTAKOM ATT-8509? |
Press Logger Button once and the LCD will display the sample time.
Up
|
How to clean the memory space when operating AKTAKOM ATT-5809? |
If you see in the bottom right corner of the LCD “Full” inscription that means the memory is full accordingly. To clean it you need to take the following steps:
- Press ENTER Button once, then press ENTER Button to confirm.
- Press ESC Button once to quit and return to the main measurement manual.
Up
|
How to replace the battery of AKTAKOM ATT-1508 Light meter and when? |
- You will easily get to know when the battery charge is low when you see "LOBAT" inscription in the left corner of the LCD, it indicates the battery output less than 6.5 V - 7.5 V. In that case you have to replace the battery. However measurement could still be taken for another few hours.
- Open the Battery Cover at the back of ATT-1508 and remove the battery.
- Replace it with a new 9V battery and reinstate the cover.
Up
|
How to save data from the SD card to my PC when operating AKTAKOM ATE-1537 light meter? |
- After Data Logger function use, take away the SD card out from the SD card socket.
- Plug in the SD card into the Computer SD card slot or insert the SD card into the SD card adapter. Then connect the SD card adapter into the computer.
- Power ON your PC and run EXCEL software. Download the saving data file from the SD card to the computer. The saving data will be presented in EXCEL software screen, then user can use these EXCEL data to make further Data or Graphic analysis.
Up
|
What should I do if RPM is low when operating AKTAKOM ATT-6000 tachometer? |
When making low RPM measurements attach several reflecting tape marks evenly. This will improve resolution and sampling time. Divide the reading shown on the display by the number of reflecting tape marks in order to get the correct measuring results.
Up
|
How to save data from the SD card to the computer when operating AKTAKOM ATE-9380 Thermometer monitor? |
- After execute the Data Logger function, take away the SD card out from the SD card socket.
- Plug in the SD card into the Computer's SD card slot or insert the SD card into the SD card adapter. Then connect the SD card adapter into the computer.
- Power ON the computer and run the "EXCEL software". Download the saving data file (for example the file name: TMC01001.XLS, TMC01002.XLS) from the SD card to the computer. The saving data will present into the EXCEL software screen (for example as following EXCEL data screens), then user can use those EXCEL data to make the further Data or Graphic analysis usefully.
Up
|
How to save data from SD card to the computer when using AKTAKOM ATE-9030 (ATE-9030BT) Sound level meter? |
- After execute the Data Logger function, take away the SD card out from the "SD card socket".
- Plug in the SD card into the Computer's SD card slot (if your computer build in this installation) or insert the SD card into the "SD card adapter". Then connect "SD card adapter" into the computer.
- Power ON the computer and run the "EXCEL software". Download the saving data file (for example the filename: SLA01001.XLS, SLA01002.XLS) from the SD card to the computer. The saving data will present into the EXCEL software screen (for example as following EXCEL data screens), then user can use those EXCEL data to make the further Data or Graphic analysis usefully.
Up
|
How to check sampling time information when operating AKTAKOM ATE-9030 (ATE-9030BT) Sound level meter? |
During the measurement, if you press "Sampling Check Button" once, the lower LCD display will present the Sampling time information in second unit.
Up
|
How to set emissivity when using ATE-2523? |
Most (90% of typical applications) organic materials and painted or oxidized surfaces have an emissivity of 0.95 (pre-set in the unit).
Inaccurate readings will result from measuring shiny or polished metal surfaces. To compensate, cove the surface to be measured with masking tape or flat black paint. Allow time for the tape to reach the same temperature as the material underneath it. Measure the temperature of the tape or painted surface.
Up
|
How to measure temperature with ATE-2523 pyrometer? |
- Pull and hold the Trigger to turn the meter on and begin testing. The display will light if the battery is good. Replace the battery if the display does not light. While measuring, the SCAN display icon will flicker in the upper left hand corner of the LCD.
- Release the Trigger and the HOLD display icon will appear on the LCD indicating that the reading is being held.
- The meter will automatically power down after approximately 7 seconds after the trigger is released.
Up
|
How to select the required temperature measurement unit when using ATE-2523? |
- Select the temperature units (°C or °F) using the C/F buttons.
- If you select Celsius you will see °C indicated, if you select Fahrenheit - °F.
Up
|
How to activate and deactivate auto turn-off of ATE-1033 or ATE-1033BT (ATE-1034, ATE-1034BT)? |
To activate or deactivate auto turn-off function press «SET ▼» button and keep it pressed within next 2 seconds.
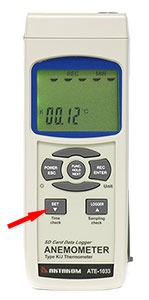
The device will enter the extended setting mode.
Sequentially press «FUNC./HOLD/NEXT» button until you see «PoFF» symbols down the display.
By pressing «SET▼» or «LOGGER▲» buttons select activation (yes) or deactivation (no) auto turn-off function.
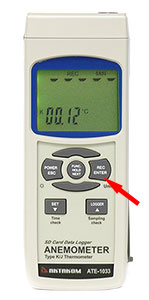
To confirm your choice press «REC/ENTER» button.
Up
|
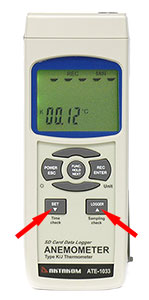
How to switch on or off the beep when operating ATE-1033 or ATE-1033BT (ATE-1034, ATE-1034BT)? |
In order to switch on/off the beep you need to press «SET ▼» and keep it pressed for 2 seconds.
The device will enter the extended setting mode.
Sequentially press «FUNC./HOLD/NEXT» button until you see «bEEP» symbols down the display.
By pressing «SET▼» or «LOGGER▲» buttons select switching on (yes) or off (no) the beep.
To confirm your choice press «REC/ENTER» button.
Up
|
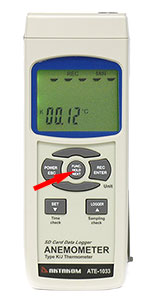
How to switch on and off the display backlight of ATE-1033 or ATE-1033BT (ATE-1034, ATE-1034BT)? |
When you switch on the device the display backlight should switch on automatically.
During the measurement process you may press «POWER/ESC» button once not keeping it pressed.
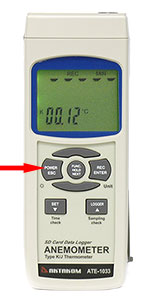
Backlight will be switched off.
If you would like to switch it on you need to press «POWER/ESC» button once again.
Up
|
How to check Android USB-host functions using «USB Host Diagnostics»? |
- Install USB Host Diagnostics application on your Android device and run it.
- Start diagnostics by clicking the key of the same name.
- Follow the displayed instructions of the application.
- After the diagnostics check the condition of Android API. «claims support = no, device detected = no» means your device IS NOT ready for operation with USB-devices.
- In this case the application should offer to correct the error after the diagnostics and to restart Android.
- Agree to the application by clicking «Ok» after that restart your device pressing the power button of the device.
- Run the utility again and make sure the condition of Android API has changed for «claims support = yes, device detected = yes».
- Now your device is ready to work with USB-devices.
If due to some reasons you do not have a chance to use this utility or would like to find more information by yourself you may search it online with the key phrases «android.hardware.usb.host.xml».
Up
|
My Android device doesn’t work with AKTAKOM ACE-1025 (ACE-1026) and can’t get data from the device connected to it. What is the reason? |
To make your Android-based device (tablet PC, smartphone) operate with connected USB-devices it should meet some requirement that you may find in the description of Aktakom Data Logger Monitor (ADLM-A). Here are some of the most important features to pay attention to:
- Android settings should allow applications to use API USB-host functions. Some of Android-based devices do not provide such permit on default (as a rule these are specialized devices like television-game device or set-top box etc.).
- To check this functions (whether they are allowed or not) on your Android device you may use for example free utility «USB Host Diagnostics» available on Google Play. This utility can in some cases install necessary permit in the system.
Up
|
What is the difference between ACE-1025 and ACE-1026? |
These converters fit different device types. To see which interface converter fits your device visit ACE-1025 and ACE-1026 pages.
Up
|
How to use ACE-1025 and ACE-1026 converters with my tabled PC? |
Therefore you need to buy Aktakom Data Logger Monitor (ADLM-A).To connect USB converter you will need a special adapter – USB OTG.
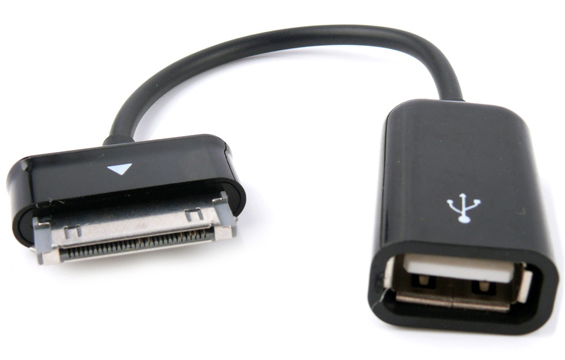 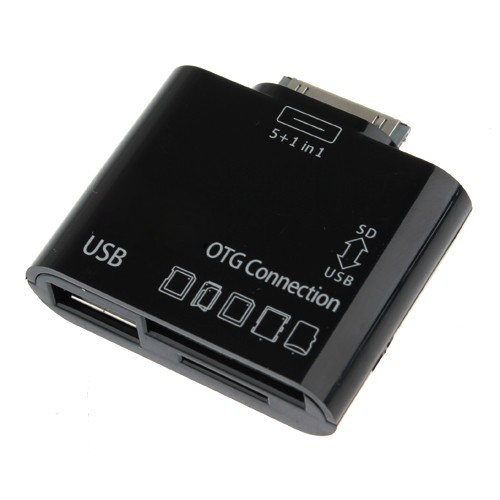
This adapter is not included into the delivery set.
Up
|
How to record data (Max., Min. reading) when using ATE-8702 magnetic meter? |
The data record function records the maximum and minimum readings. Press the "REC Button" once to start the Data Record function and there will be a "REC" symbol on the display.
With the "REC" symbol on the display do the following:
- Press the "REC Button" once, the "REC. MAX" symbol along with the maximum value will appear on the display. If intend to delete the maximum value, just press the "Hold Button" once, then the display will show the "REC." symbol only & execute the memory function continuously.
- Press the "REC Button" again, the "REC. MIN" symbol along with the minimum value will appear on the display. If intend to delete the minimum value, just press the "Hold Button" once, then the display will show the "REC." symbol only & execute the memory function continuously.
- To exit the memory record function, just press the "REC Button" for 2 seconds at least. The display will revert to the current reading.
Remark: When make the DC magnetic field measurement and execute the "RECORD" function, it can not change from the "North pole" to "South pole" or from the "South pole" to "North pole" during the measurement. It can make the measurement under the same pole (S pole or N pole) only, otherwise the Max., Min. value will be no sense.
Up
|
How to hold data when using ATE-8702 magnetic meter? |
During the measurement, press the "Hold Button" once will hold the measured value & the LCD will display a "HOLD" symbol. Press the "Hold Button" once again will release the data hold function.
Up
|
How to measure AC and DC magnetic fields using ATE-8702 magnetic meter? |
Do the following:
- Power ON the meter by pressing the "Power Button" once.
- Press the "Mode Button" once, the Display will show the following screen in sequence :
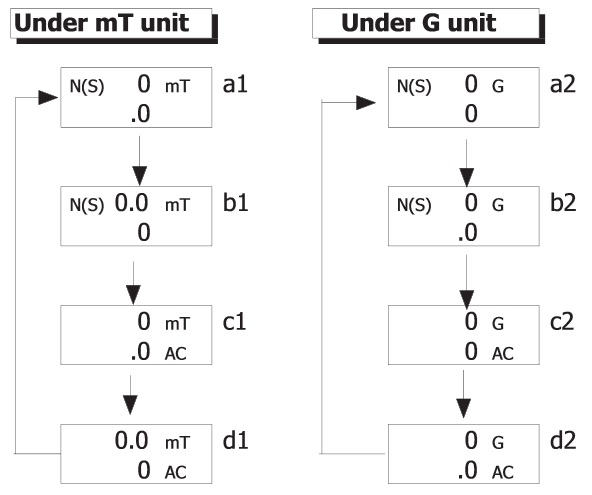
a1 screen is ready for DC 0.1 mT resolution measurement.
b1 screen is ready for DC 0.01 mT resolution measurement.
c1 screen is ready for AC 0.1 mT resolution measurement.
d1 screen is ready for AC 0.01 resolution measurement.
a2 screen is ready for DC 1 G resolution measurement.
b2 screen is ready for DC 0.1 G resolution measurement.
c2 screen is ready for AC 1 G resolution measurement.
d2 screen is ready for AC 0.1 G resolution measurement.
- Display indicator:
DC magnetic field measurement:
• The Display will show "N" or "S" indicator
• North pole: Display will show "N" indicator
• South pole: Display will show "S" indicator
AC magnetic field measurement:
• Display will show "AC" indicator
• Display will not show " N (S) indicatorUnit selection:
- How to select the unit (mG, uT), the procedures please refer to chapter 5-1 "Change the unit (mT, G)" of the user manual.
- Contact and close the testing material to the probe head, the Display will show the magnetic field value along with the unit (mG, uT).
- Zero adjustment:
When power ON the meter, due to the environment interference, the display may show certain values (not zero value), it is normal.
* Before the measurement, fix the probe at the exact position, press the "ZERO Button" continuously at least two seconds until the display show " 0 " value, in the same time the Display will show the " 0 " indicator then release the finger from the button.
* Press the "ZERO Button" continuously at least two seconds again, the "O" indicator will be disappeared and the Display will return to the "no zero" value (show the environment magnetic field value).
Up
|
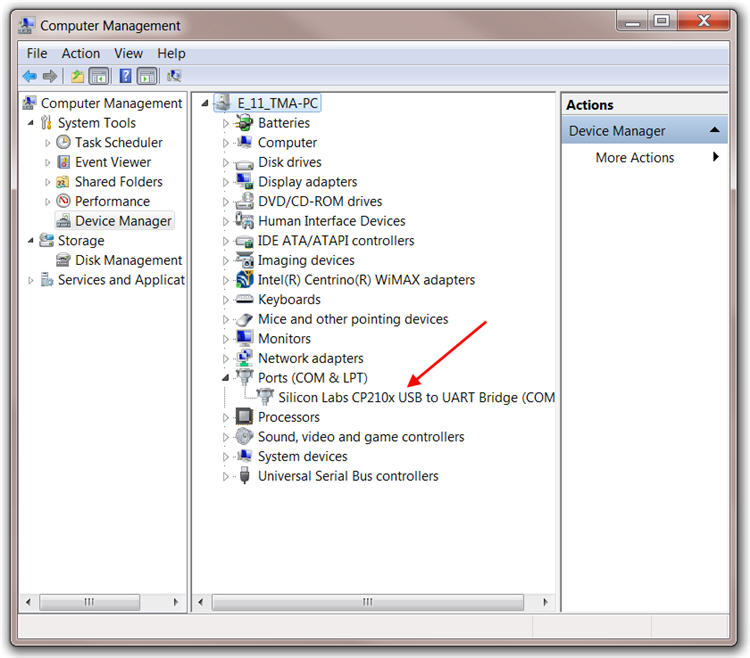
How to check if the driver is properly installed? |
To check if your driver is properly installed please go to your Windows Device Manager and check your device is installed as per picture below.
Up
|
How to collect your recorder data using Datalogger memory card? |
Once you have finished to record your measurements with your Data Logger memory card just take off the card from your equipment and stick in to your computer. You'll be able to read the plain files using Microsoft Excel or any open source software.
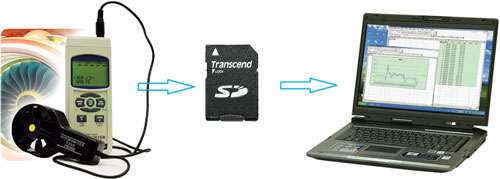
SD card capacity: 1 GB to 16 GB available everywhere
Up
|
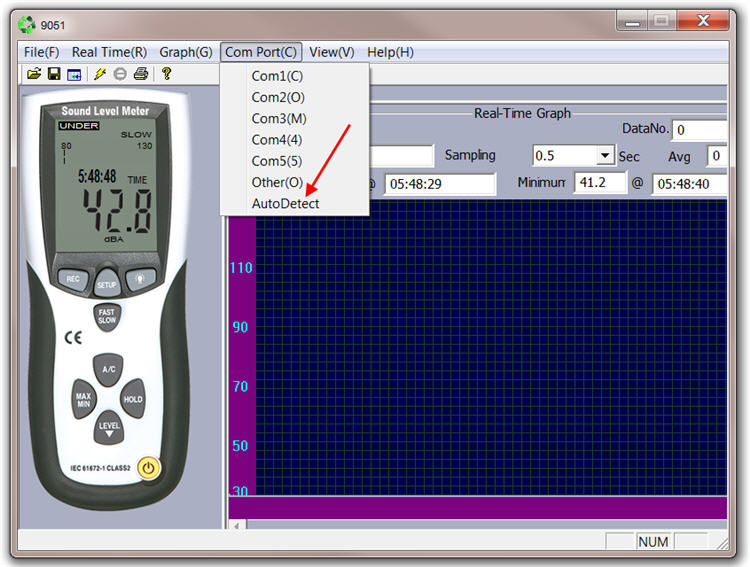
How to connect your ATE-9051 to your computer? |
Before you connect your new device to your computer using the USB cable that comes with the device you should install the software and driver that comes with it or that you download from our site. You may receive your equipment with an old driver version that works only till Vista. Please download from our site the new driver version and install it properly.
How to check if your driver is properly installed
Also your software may display an icon software 8051 instead of 9051. Don't worry, both are same software version. Finally, to connect your device you just click on a Com Port(C) tab and choose the AutoDetect option. If you do not see values in your screen please go to your Windows Device Manager and check your device is installed as per picture above.
Up
|
|
|
