|
Frequently Asked Questions
Clamp Meters
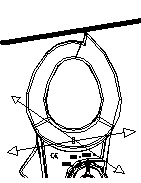
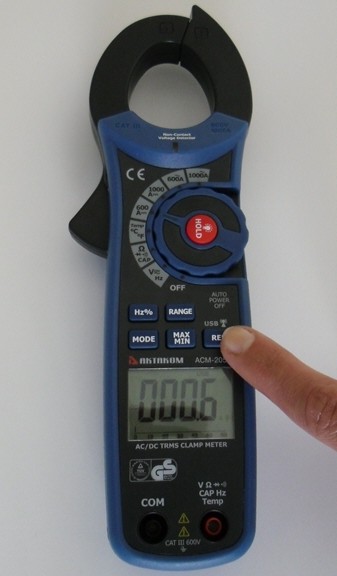
How to use non-contact voltage detector in AKTAKOM ACM-2352 clamp meter?
How to fix max. and min. values on AKTAKOM ACM-2352 clamp meter?
How to use AKTAKOM ATK-2250 clamp meter together with an oscilloscope or multimeter?
How to measure resistance or make the continuity test with Aktakom ATK-2250 clamp meter?
How to measure AC/DC voltage with Aktakom ATK-2250 clamp meter?
How to hold max./min. values on Aktakom ATK-2250 clamp meter?
How to activate the relative measurement mode when using Aktakom ATK-2250 clamp meter?
How to select measurement range on Aktakom ATK-2250 clamp meter?
How to hold the readings on the LCD on AKTAKOM ATK-2001 clamp meter?
How to measure Max/Min values with AKTAKOM ATK-2001 clamp meter?
How to make relative measurements with AKTAKOM ATK-2001 clamp meter?
How to measure DC/AC voltage with AKTAKOM ATK-2001 clamp meter?
How to measure DC/AC current with AKTAKOM ATK-2001 clamp meter?
How to measure AC voltage frequency with AKTAKOM ATK-2301 clamp meter?
How to measure HOLD, MAX, MIN and PEAK value of AC Voltage with ATK-2301 clamp meter?
How to measure True RMS value of AC Voltage with ATK-2301 clamp meter?
How to measure AC voltage using Aktakom ATK-2301 clamp meter?
How to measure the frequency of AC current with ATK-2301 clamp meter?
How to measure harmonics of AC Current in Percentage (%) with Aktakom ATK-2301?
How to measure harmonics of AC Current in Magnitude (mA or A) with ATK-2301 clamp meter?
How to measure HOLD, MAX, MIN and PEAK of AC Current with ATK-2301 clamp meter?
How to measure AC mA and A using Aktakom ATK-2301 clamp meter?
How to measure frequency with Aktakom ACM-2047 clamp meter?
How to measure maximum and minimum values with Aktakom ACM-2047 clamp meter?
How to take relative measurement with Aktakom ACM-2047 clamp meter?
How to measure direct current with Aktakom ACM-2047 clamp meter?
How to set the sampling interval on AKTAKOM ATK-4001 clamp meter?
How to read the data stored in the memory of AKTAKOM ATK-4001 clamp meter?
How to activate data logging function of AKTAKOM ATK-4001 clamp meter?
How to fix the normal frequency on ATK-2011 clamp meter?
How to disable Auto Power Off function of AKTAKOM ATK-2011 clamp meter?
How to disable auto switch off function of AKTAKOM ATK-4001 clamp meter?
How to clean the memory of AKTAKOM ATK-4001 clamp meter?
How to recover from Auto-Power-off when using AKTAKOM ATK-2040 clamp meter?
How to check MAX and MIN values when using AKTAKOM ATK-2040 clamp meter?
How to replace the battery of AKTAKOM ATK-2200?
How to measure resistance and perform continuity check with ACM-2036 clamp meter?
How to measure DC Current with ACM-2036 clamp meter?
How to measure AC Current with ACM-2036 clamp meters?
How to measure temperature using ACM-1010 AC clamp meter and thermometer?
How to make audible continuity test using ACM-1010 AC clamp meter and thermometer?
How to measure resistance using ACM-1010 AC clamp meter and thermometer?
How to measure AC current using ACM-1010 AC clamp meter and thermometer?
How to measure AC voltage using ACM-1010 AC clamp meter and thermometer?
How to measure DC voltage using ACM-1010 AC clamp meter and thermometer?
Is my USB driver properly installed?
How to turn off the AUTOPOWER OFF?
How to use non-contact voltage detector in AKTAKOM ACM-2352 clamp meter? |
To use the non-contact voltage detector of AKTAKOM ACM-2352 clamp meter do the following:
- Before the use always test the Voltage Detector on a known live circuit to verify proper operation.
- Rotate the function switch to any measurement position.
- Place the detector probe tip on the conductor to be tested.
- If AC voltage is present, the NCV detector will turn on with a steady red light.
Note: The conductors in electrical cord sets are often twisted. For best results move the probe tip along a length of the cord to assure placing the tip close to the live conductor.
Up
|
How to fix max. and min. values on AKTAKOM ACM-2352 clamp meter? |
Yes, you may fix max. and min. values following the below step:
- Press MAX/MIN button to activate MAX/MIN recording mode. The display icon "MAX" will appear. ACM-2352 will start recording and displaying the measured maximum value.
- Press MAX/MIN button again and “MIN” will appear on the display. ACM-2352 will display the measured minimum value during the recording session.
- Press MAX/MIN button and “MAX MIN” will appear. The clamp meter will display the present reading but will continue to update and store the max and min readings.
- To exit MAX/MIN mode press and hold the MAX/MIN button for about 2 seconds.
Up
|
How to use AKTAKOM ATK-2250 clamp meter together with an oscilloscope or multimeter? |
AKTAKOM ATK-2250 can be used together with an oscilloscope or external multimeter. Therefore follow the below steps:
- Set the rotary switch to «
 A» or «~A». A» or «~A».
- Connect the test leads (they are not included into the standard accessories kit) to «+» and «COM» respectively.
- Connect these sockets with the similar sockets of the multimeter or, using a special cable, with the oscilloscope socket and the display will show the measured value
Up
|
How to measure resistance or make the continuity test with Aktakom ATK-2250 clamp meter? |
To measure resistance or make the continuity test with Aktakom ATK-2250 clamp meter take the following steps:
-
Set the rotary switch to «Ω» or «
 ». ».
-
Connect the black cable to COM port, the red one – to “+”.
-
Connect the probes to 2 points of the circuit under test or resistor. See the readings on the display.
-
If the circuit resistance is less than 40 Ohm – in continuity test you will hear a sound signal.
Up
|
How to measure AC/DC voltage with Aktakom ATK-2250 clamp meter? |
To measure AC/DC voltage with with Aktakom ATK-2250 clamp meter take the following steps:
-
Set the rotary switch to « V» or «~ V».
-
Connect the black cable to COM port, the red one – to “+”.
-
Connect the probes to the circuit under measurement and see the device readings.
Note: Measurement of voltage over 600 V rms is not allowed.
Up
|
How to hold max./min. values on Aktakom ATK-2250 clamp meter? |
|
To hold max./min. values when operating Aktakom ATK-2250 clamp meter you need to press Max/Min button. The display will show “H” and “MIN” symbols. ATK-2250 will start the measurement process fixing the minimum value from the measured values. If the button is pressed again the device will fix the maximum value ("MAX" symbol). If you press the button once again the clamp meter will return to the normal measurement mode. This function can not work simultaneously with the relative measurement function.
Up
|
How to activate the relative measurement mode when using Aktakom ATK-2250 clamp meter? |
|
To activate the relative measurement mode in Aktakom ATK-2250 clamp meter press REL button. The last measured value will be taken as the reference one, the display will show zeros. The results of the subsequent measurements will be displayed as the difference between the current and reference values. To turn off the function press and keep REL button pressed for at least 2 seconds. This function can not work simultaneously with the function of max./min. values hold.
Up
|
How to select measurement range on Aktakom ATK-2250 clamp meter? |
|
To use the manual mode of measurement range selection in Aktakom ATK-2250 clamp meter press RANGE button. To return to the automatic mode (it’s active on default when you power on the clamp meter) press and keep RANGE button pressed for at least 2 seconds.
Up
|
How to hold the readings on the LCD on AKTAKOM ATK-2001 clamp meter? |
Press HOLD button, then the readings shall be hold and kept on the LCD. If you double press this button the data updating will be restored.
Up
|
How to measure Max/Min values with AKTAKOM ATK-2001 clamp meter? |
Press MAX/MIN button to enable the maximum and minimum values. Press the button once, the maximum value shall be displayed and updated. After you press this button secondly the LCD will display the minimum value. To return to the normal mode you need to press this button for the third time. To exit MAX/MIN function, press and hold the MAX/MIN button for more than 2 seconds. The Zero/Relative function will be disabled as well if you press MAX/MIN button.
Up
|
How to make relative measurements with AKTAKOM ATK-2001 clamp meter? |
The zero button also can be used to make a relative measurement. After the button is pressed the current reading is set to zero and “∆” symbol shall be displayed on the LCD. All the subsequent measurement shall be displayed as a relative value with respect to the value being zeroed. Press the zero button again and keep it pressed for 2 seconds to return to the normal mode. This function is disabled as well if you press MAX/MIN button.
Up
|
How to measure DC/AC voltage with AKTAKOM ATK-2001 clamp meter? |
Note: Maximum input for DC V is 600, and for AC V is 600. Do not take any voltage measurement that exceeds these limits. Exceeding the limits could cause electrical shock and damage to the clamp meter.
Do the following:
- For DC voltage measurement set the rotary switch to V DC. For AC voltage measurement set the rotary switch to V AC.
- Insert the test leads into the input jack.
- Connect the test prods of the test leads in PARALLEL to the circuit to be measured.
- Read the measured value from the LCD display.
Up
|
How to measure DC/AC current with AKTAKOM ATK-2001 clamp meter? |
Note: Make sure that all the test leads are disconnected from the meter terminals for current measurement.
Do the following:
- For DC current set the rotary switch at mA DC or 40A DC. Push the zero button to adjust the reading to zero. Due to the high sensitivity of ATK-2001 clamp meter zero must be set in the same direction as during the measurement process to avoid interference by external magnetic field.
- For AC current set the rotary switch at 400mA AC, 4000mA or 30A AC.
- Press the trigger to open the jaw and fully enclose the conductor to be measured. No air gap is allowed between the two half jaws.
- Read the measured value from the LCD display.
Up
|
How to measure AC voltage frequency with AKTAKOM ATK-2301 clamp meter? |
Take the following steps:
- Set the rotary switch to V position.
- Insert the test leads into the input jack. Connect the test prods of the test leads in PARALLEL with the circuit to be measured.
- Press FUNC button five times. Hz symbol will be displayed.
- The frequency of AC voltage will be measured and shown on the display. If the frequency is less than 40 Hz, 0 Hz will be displayed. If the frequency is more than 65 Hz, OL Hz will be shown on the LCD.
Note: AC voltage must be more than 50V for frequency measurement.
Up
|
How to measure HOLD, MAX, MIN and PEAK value of AC Voltage with ATK-2301 clamp meter? |
Do the following:
- Set the rotary switch at position V. Then select the correct fundamental frequency by moving the sliding switch on the side of the tester.
- Insert the test leads into the input jack. Connect the test prods of the test leads in PARALLEL to the circuit to be measured.
- The measured value will be displayed. If ▼ button is pressed, “HOLD”, “MAX”, “MIN” or “PEAK” symbol will be shown on the LCD alternatively. And the value of the HOLD, MAX, MIN or PEAK function will be displayed.
- To return to the display of current measurement, hold ▼ button for more than 2 seconds.
Note: PEAK function displays the maximum value of AC periodic waveform. The sampling time for PEAK function is 39μs (50Hz) or 33μs (60Hz). HOLD, MAX, or MIN function displays the true RMS value.
Up
|
How to measure True RMS value of AC Voltage with ATK-2301 clamp meter? |
Do the following:
- Set the rotary switch to V position. Then select the correct fundamental frequency by moving the sliding switch on the side of the tester.
- Insert the test leads into the input jack. Connect the test prods of the test leads in PARALLEL to the circuit to be measured.
- Read the measured RMS value on the display.
Up
|
How to measure AC voltage using Aktakom ATK-2301 clamp meter? |
Do the following:
- Select the correct fundamental frequency of voltage by moving the sliding switch on the side of the tester.
- If the peak value of the input AC voltage is more than the range maximum value, then symbol OL will be displayed.
- If user holds ▲ button and turns the power on, ATK-2301 will enter AUTO Hz mode. The unit will automatically detect the frequency between 45 to 65Hz. Additional error occurs if the measured frequency is not 50 or 60 Hz.
Note: Whenever the rotary switch is set at a new position, the CT ratio and fundamental frequency will be displayed first.
If the CT ratio is not 1, a symbol of “CT” will be displayed.
Warning: Maximum input for ACV is 600. Do not attempt to take any voltage measurement that exceeds the limits. Exceeding the limits could cause electrical shock and damage to the clamp meter.
Up
|
How to measure the frequency of AC current with ATK-2301 clamp meter? |
To measure frequency take the following steps:
- Set the rotary switch to “mA” or “A” position depending on the range of AC current.
- Press the trigger to open the clamps and fully enclose the conductor to be measured.
- Press FUNC button five times. Hz symbol will be shown on the LCD.
- The frequency of AC current will be measured and shown on the LCD. If the frequency is less than 40 Hz, 0 Hz will be displayed. If the frequency is more than 65 Hz, OL Hz will be displayed.
Note: In mA range AC current must be more than 10mA for frequency measurement. In A range, AC current must be more than 1A for frequency measurement.
Up
|
How to measure harmonics of AC Current in Percentage (%) with Aktakom ATK-2301? |
Take the following steps:
- Set the rotary switch to “mA” or “A” position depending on the range of AC current. Then select the correct fundamental frequency by moving the sliding switch on the side of the tester.
- Press the trigger to open the jaw and fully enclose the conductor to be measured.
- Press FUNC button twice. The symbols of “Harmonic” and “NO” will be shown in LCD. The n-th order (1 to 99) will be shown in front of the reading of the percentage (%) of the current.
- Press ▲ or ▼ button to increment or decrement the order of harmonics in front of the reading. The number will roll over when the maximum (99) or minimum (1) is reached.
Up
|
How to measure harmonics of AC Current in Magnitude (mA or A) with ATK-2301 clamp meter? |
Do the following:
- Set the rotary switch to “mA” or “A” position depending on the range of AC current. Then select the correct fundamental frequency by moving the sliding switch on the side of the tester.
- Press the trigger to open the clamps and fully enclose the conductor to be measured.
- Press FUNC button once. The symbols of “Harmonic” and “NO” will be shown on the LCD. The n-th order (1 to 99) will be shown in front of the reading of the magnitude (mA or A) of the current.
- Press ▲ or ▼ button to increment or decrement the order of harmonics in front of the reading. The number will roll over when the maximum (99) or minimum (1) is reached.
Up
|
How to measure HOLD, MAX, MIN and PEAK of AC Current with ATK-2301 clamp meter? |
Take the following steps:
- Set the rotary switch at mA or A depending on the range of AC current. Then select the correct frequency by moving the sliding switch on the side of the tester.
- Press the trigger to open the clamps and fully enclose the conductor to be measured.
- The measured value can be seen on the display. If ▼button is pressed “HOLD”, “MAX”, “MIN” or “PEAK” symbols will be displayed alternatively. And the value of HOLD, MAX, MIN or PEAK function will be displayed.
- To return to the display of current measurement, hold ▼ button for more than 2 seconds.
Up
|
How to measure AC mA and A using Aktakom ATK-2301 clamp meter? |
Take the following steps:
- Select the correct fundamental frequency (50 or 60 Hz) of current by moving the sliding switch at the side of the tester. Or hold ▲ button to select AUTO Hz.
- Select the proper position of the rotary switch for the current range. If AC current is less than 0.6A, then set the rotary switch at mA position. If AC current is more than 0.6A, set the rotary switch at A position.
- If the peak value of the input AC current is more than the maximum value of the range, then symbol of OL will be displayed.
- If user holds ▲ button and turns the power on, the unit will enter AUTO Hz mode. Aktakom ATK-2301 will automatically detect the frequency between 45 to 65Hz. Additional error occurs if the measured frequency is not 50 or 60 Hz.
Note: Whenever the rotary switch is set to a new position, the CT ratio and fundamental frequency will be displayed first. If the unit clamps on to a load (current) about twice the range, the unit will not only display OL, but also Low Battery.
If the CT ratio is not 1, a symbol of “CT” will be shown on the display for the measurement of mA or A. The reading of current shown on the LCD is equal to the true RMS value measured by the tester multiplied by CT ratio (A LCD = A RMS × CT). Make sure that all of the test leads are disconnected from the meter's terminals for current measurement.
Up
|
How to measure frequency with Aktakom ACM-2047 clamp meter? |
Do the following:
- Make sure the wire under measurement contains alternating current not less than 0.1A.
- Set the rotary switch to Hz.
- Open the clamp meter jaws and grab a single wire with current. Close the jaws. Note: Air gap between the jaws is not acceptable. It’s not acceptable either to grab several wires with current since it will cause incorrect measurement results.
- See the readings on the device display.
Up
|
How to measure maximum and minimum values with Aktakom ACM-2047 clamp meter? |
|
To enter the mode of maximum and minimum values use MAX/MIN button. Every single pressing will display the maximum and then the minimum value for the time of measurement in this mode. To return to the normal mode keep MAX/MIN button pressed for 2 s.
Up
|
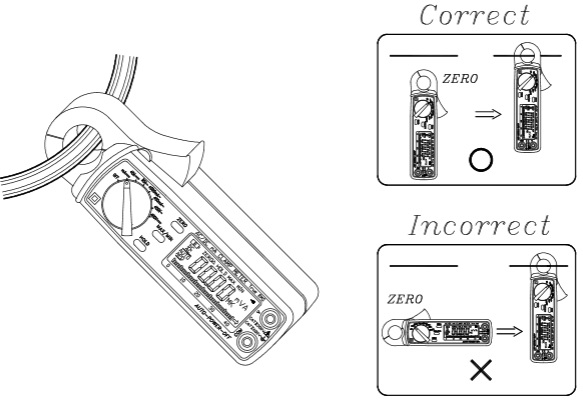
How to take relative measurement with Aktakom ACM-2047 clamp meter? |
|
ZERO button can be also used to take relative measurements of DC and AC strength. After you press ZERO the current value turns to 0. All next measurements are shifted by the measurement value which was prior to 0 setting. To return to the normal mode keep ZERO button pressed for 2 s. This measurement mode can be canceled with MAX/MIN buttons.
Up
|
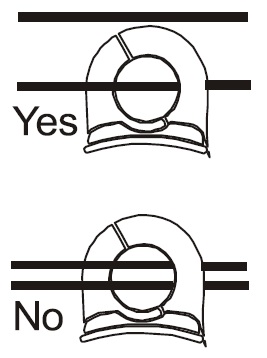
How to measure direct current with Aktakom ACM-2047 clamp meter? |
Take the following steps:
- Before you start measuring DC strength press ZERO button to set ACM-2047 values to 0. Since the device has rather high sensitivity, in order to escape noise caused by the external magnetic field, user should set 0 in the same conditions which will be used while taking measurements.
- Open the clamp meter jaws and grab a single wire with current. Close the jaws. Note: Air gap between the jaws is not acceptable. It’s not acceptable either to grab several wires with current since it will cause incorrect measurement results.
- See the readings on the device display.
Up
|
How to set the sampling interval on AKTAKOM ATK-4001 clamp meter? |
Do the following:
- Press FUNC button until “SEC” symbol is displayed in the upper line of the LCD.
- ATK-4001 clamp meter shows the current sampling interval in seconds.
- Press ▲ or ▼ button to increment/decrement the value by 1 second. As user holds the button longer, the speed of incrementing/decrementing will become faster. The value can be incremented/decremented from 0 to 255 / 255 to 0 seconds. Value will roll over when the value of maximum 255/minimum 0 seconds is reached.
- Press FUNC button several times until the upper line of the LCD displays no symbols.
Up
|
How to read the data stored in the memory of AKTAKOM ATK-4001 clamp meter? |
This function allows users to read the stored data if no PC is available. Therefore:
- Press FUNC button until “NO” symbol is shown on the LCD. The current record number is shown in the upper line of the LCD. And the data is shown in the lower line.
- Press ▲ or ▼ button to read the next/previous data,
- If user holds ▲ or ▼ button longer, the record number will be incremented/decremented faster. The record number will roll over when the last/first record is reached.
Up
|
How to activate data logging function of AKTAKOM ATK-4001 clamp meter? |
ATK-4001 will start data logging if the REC button is pressed, and a symbol of REC will be shown in LCD. Data will be recorded at the specified sampling interval.
Data logging will be stopped if the memory is full, or the unit detects the condition of low battery, or the REC button is pressed again.
Up
|
How to fix the normal frequency on ATK-2011 clamp meter? |
When the power is turned on, the tester will measure the frequency of signal automatically. If users wish to fix the measuring frequency at 50 or 60 Hz, they can hold the 50/60Hz button and turn the power on.
Up
|
How to disable Auto Power Off function of AKTAKOM ATK-2011 clamp meter? |
The tester has an auto-power-off function. The tester will turn the power off after power is turned on for 15 minutes. To disable the auto power off function, hold the HOLD button, and then turn the power on.
Up
|
How to disable auto switch off function of AKTAKOM ATK-4001 clamp meter? |
When you switch on ATK-4001 you will see “AP” sign on the display. That means the clamp meter will be switched off in approximately 4…6 minutes. To cancel this function you need to keep FUNC button pressed and then power off the device. “AP” will disappear from the display.
Up
|
How to clean the memory of AKTAKOM ATK-4001 clamp meter? |
Press and keep pressed REC button, power on the device afterwards. You will see “CL” displayed meaning the memory is cleaned?
Up
|
How to recover from Auto-Power-off when using AKTAKOM ATK-2040 clamp meter? |
- The meter will turn itself off 15 minutes after power-on (A symbol of APO is displayed in LCD). To turn it on again, user can either press any button or turn the rotary switch. Also pressing any button or turning the rotary switch will reset the 15 minute timer.
- To disable the Auto-Power-Off function, hold the HOLD button while turning on power.
Up
|
How to check MAX and MIN values when using AKTAKOM ATK-2040 clamp meter? |
Press the MAX/MIN button to enable the maximum and minimum values to be recorded and updated during measurement. Push the button once, the maximum value shall be displayed and updated. The LCD display toggles between the MAX and MIN values. To exit MAX/MIN function, press and hold the MAX/MIN button for more than 2 seconds. If MAX/MIN button is pressed, the ZERO function will be disabled and the ZERO symbol will disappear from LCD.
Up
|
How to replace the battery of AKTAKOM ATK-2200? |
When the low battery symbol is displayed on the LCD, replace the old battery with a new battery. Therefore:
- Turn the power off and remove the test leads from the power clamp.
- Remove the screws of the bottom case.
- Lift and remove the bottom case.
- Remove the old battery.
- Insert a new 9V battery.
- Replace the bottom case and secure the screws.
Up
|
How to measure resistance and perform continuity check with ACM-2036 clamp meter? |
Do the following:
- Insert the black test lead into the negative COM terminal and the red test lead into the positive terminal.
- Touch the test probe tips across the circuit or component under test. It is best to disconnect one side of the device under test so the rest of the circuit will not interfere with the resistance reading.
- For Resistance tests, read the resistance on the LCD display and if the resistance is <30Ω, you will hear a sound.
Up
|
How to measure DC Current with ACM-2036 clamp meter? |
Take the following steps:
- Set the Function switch to the DCA range.
- Press the DCA ZERO key to null the meter display.
- Press the Trigger to open the current sense Jaw.
- Fully enclose the conductor to be measured. Do not allow a gap between the two halves of the jaw.
- Read the DCA value on the LCD.
Up
|
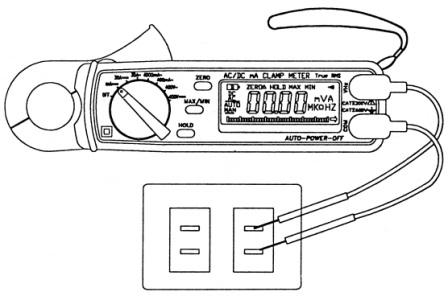
How to measure AC Current with ACM-2036 clamp meters? |
Do the following:
- Set the Function switch to the ACA range.
- Press the jaw trigger and clamp around, fully enclosing a single conductor. Do not allow a gap between the two halves of the jaw. Refer to the picture below for the correct way to enclose a single conductor.
- Read the ACA value on the LCD.
Up
|
How to measure temperature using ACM-1010 AC clamp meter and thermometer? |
Do the following:
- Set the rotary switch at 750°C position.
- Connect the red lead of “K” type thermocouple into the “V/Ω” jack and the black lead of “K” type thermocouple into the “COM” jack. The LCD display will show the current environment temperature.
- Contacting the object be measured with the thermocouple probe.
- Read temperature value on the LCD display.
Up
|
How to make audible continuity test using ACM-1010 AC clamp meter and thermometer? |
Do the following:
- Connect red test lead to “V/Ω” jack, black test lead to “COM” jack.
- Set range switch to “
 ” position. ” position.
- Connect test leads to two points of circuit to be tested. If continuity exists, built-in buzzer will sound.
Up
|
How to measure resistance using ACM-1010 AC clamp meter and thermometer? |
Do the following:
- Connect the red test lead to “V/Ω” jack and black test lead to the “COM” jack (The polarity of red lead is positive “+”).
- Set the rotary switch at desired ”Ω” range position.
- Connect test leads across the resistor to be measured and read LCD display.
- If the resistance being measured is connected to a circuit, turn off power and discharge all capacitors before applying test probes.
Note:
- If the resistance being measured exceeds the maximum value of the range selected or the input is not connected, an overrange indication “1” will be displayed.
- When checking in-circuit resistance, be sure the circuit under test has all power removed and that all capacitors have been discharged fully.
Up
|
How to measure AC current using ACM-1010 AC clamp meter and thermometer? |
Do the following:
- Set the rotary switch at desired A∼ position.
- Press the trigger to open transformer jaw and to clamp one conductor only, making sure that the jaw is firmly closed around the conductor.
- Read current value on LCD display.
- When only the figure “1” is displayed, it indicates overrange situation and the higher range has to be selected.
Up
|
How to measure AC voltage using ACM-1010 AC clamp meter and thermometer? |
Take the following steps:
- Connect the red test lead to “V/Ω” jack and the black test lead to the “COM” jack.
- Set the rotary switch at desired 750V~ position.
- Connect test leads across the source or load being measured.
- Read voltage value on the LCD display
Up
|
How to measure DC voltage using ACM-1010 AC clamp meter and thermometer? |
Take the following steps:
- Connect the red test lead to the “V/Ω” jack and the black lead to the “COM” jack.
- Set rotary switch at desired 1000V
 position. position.
- Connect test leads across the source or load being measured.
- Read voltage value on the LCD display along with the polarity of the red lead connection.
Up
|
Is my USB driver properly installed? |
Go to your Control Panel \ System and Security \ System and then go to Device Manager to check if your USB driver is properly installed.

If you can not see the driver and port it means you must reinstall the driver again or give us a call.
Up
|
How to turn off the AUTOPOWER OFF? |
To turn off the AUTOPOWER OFF system in a ACM-2056 Clamp Meter, please press REL button for 2 seconds to turn on the Wireless USB function, the USB icon appears on the LCD.
To turn off the AUTOPOWER OFF system in a ACM-2353 Clamp Meter, please press USB to turn on the USB function, the USB icon appears on the LCD.
Up
|
|
|
