|
Frequently Asked Questions
Digital Multimeters
When pressing the power switch, the multimeter is still in blank screen. What should I do?
What is the meaning of CAT II, CAT III, CAT IV?
Can I measure AC and DC voltage with the same setting?
What’s the difference between analog and digital multimeters?
What is a digital multimeter (DMM)?
How is the AM-1060 powered?
What makes the AM-1060 different from a standard multimeter?
What is the AM-1060 Digital Multimeter used for?
How to measure resistance with Aktakom AM-1171 multimeter?
How to measure frequency with Aktakom AM-1171 multimeter?
How to measure temperature with Aktakom AM-1171 multimeter?
How to deactivate Auto Power Off function of AKTAKOM AM-1009 multimeter?
Does AKTAKOM AM-1009 multimeter have auto power off function?
How to select the measurement range on AKTAKOM AMM-1081 multimeter?
What does «Smart» indicator mean in the like mode of AKTAKOM AMM-1081 multimeter?
How to deactivate Auto Power Off function of AKTAKOM AMM-1048 multimeter?
Does AKTAKOM AMM-1048 multimeter have auto power off function?
Does AKTAKOM AM-1006 multimeter have auto power off function?
Does AKTAKOM AM-1109 multimeter have auto power off function?
How to deactivate Auto Power Off function of AKTAKOM AMM-1081 multimeter?
Does AKTAKOM AMM-1081 multimeter have auto power off function?
How to deactivate Auto Power Off function of AKTAKOM AMM-1061 multimeter?
Does AKTAKOM AMM-1061 multimeter have auto power off function?
How to deactivate Auto Power Off function of AKTAKOM AM-1060 multimeter?
Does AKTAKOM AM-1060 multimeter have auto power off function?
Does AKTAKOM AMM-3031 LCR meter have auto power off function?
How to deactivate Auto Power Off function of AKTAKOM AM-1108 multimeter?
Does AKTAKOM AM-1108 multimeter have auto power off function?
There are problems when connecting AKTAKOM AM-1118 multimeter, what should be done?
Does AKTAKOM AM-1118 multimeter have auto power off function?
How to deactivate Auto Power Off function of AKTAKOM AM-1018 multimeter?
Does AKTAKOM AM-1018 multimeter have auto power off function?
How to deactivate Auto Power Off function of AKTAKOM AMM-1028 multimeter?
Does AKTAKOM AMM-1028 multimeter have auto power off function?
How to deactivate Auto Power Off function of AKTAKOM AMM-1032 multimeter?
Does AKTAKOM AMM-1032 multimeter have auto power off function?
How to deactivate Auto Power Off function of AKTAKOM AMM-1009 multimeter?
Does AKTAKOM AMM-1009 multimeter have auto power off function?
How to deactivate Auto Power Off function of AKTAKOM AMM-1008 multimeter?
Does AKTAKOM AMM-1008 multimeter have auto power off function?
How to deactivate Auto Power Off function of AKTAKOM AMM-1063 multimeter?
Does AKTAKOM AMM-1063 multimeter have auto power off function?
How to deactivate Auto Power Off function of AKTAKOM AMM-1139 multimeter?
Does AKTAKOM AMM-1139 multimeter have auto power off function?
How to deactivate Auto Power Off function of AKTAKOM AMM-1062 multimeter?
Does AKTAKOM AMM-1062 multimeter have auto power off function?
How to deactivate Auto Power Off function of AKTAKOM AM-1142 or AM-1152 multimeter?
Does AKTAKOM AM-1142 or AM-1152 multimeter have auto power off function?
How to deactivate Auto Power Off function of AKTAKOM AMM-1130 multimeter?
Does AKTAKOM AMM-1130 multimeter have auto power off function?
How to deactivate Auto Power Off function of AKTAKOM AM-1171 multimeter?
Does AKTAKOM AM-1171 multimeter have auto power off function?
How to disable Auto Power Off function of AKTAKOM AM-1019 multimeter?
Does AKTAKOM AM-1019 multimeter have auto power off function?
Does AKTAKOM AM-1016 multimeter have auto power off function?
How to disable Auto Power Off function of AKTAKOM AM-1083 multimeter?
Does AKTAKOM AM-1083 multimeter have auto power off function?
How to disable Auto Power Off function of AKTAKOM AM-1038 multimeter?
Does AKTAKOM AM-1038 multimeter have auto power off function?
Is it possible to run several software copies of AM-1038 simultaneously and independently on one PC?
There are problems when connecting AKTAKOM AM-1038 multimeter, what should be done?
Does AKTAKOM AM-1152 multimeter have galvanic isolation when connecting to the PC?
How to measure maximum and minimum values using ABM-4081 multimeter?
How to measure peak value using ABM-4081 multimeter?
How to measure DC Ampere/AC Ampere using ABM-4081 multimeter?
How to measure DC μA/mA or AC µA/mA using ABM-4081 multimeter?
How to measure capacitance using ABM-4081 multimeter?
How to measure resistance, continuity, diode using ABM-4081 multimeter?
How to measure (logic) frequency and duty ratio using ABM-4081 multimeter?
How to connect test leads to IP67 waterproof instruments?
How to use PC-Link mode?
How to disable autopower off function and enable PCLINK function?
How to use PC-Link application software with AM-1118 multimeter?
How DMM is designed (disassembled view)
How to replace or install the batteries in AM-1060?
When pressing the power switch, the multimeter is still in blank screen. What should I do? |
- Check if the power cable is correctly connected.
- Check if the main power switch on the rear panel has been turned on.
- Check if the safety fuse has been blown, replace with a new one if necessary.
- Restart the instrument after taking the above steps.
Up
|
What is the meaning of CAT II, CAT III, CAT IV? |
These are safety categories defined by IEC standards:
-
CAT II: Household appliances, portable tools
-
CAT III: Distribution panels, fixed installations
-
CAT IV: Main service connections and outdoor lines
Up
|
Can I measure AC and DC voltage with the same setting? |
|
No. Always select AC (V~) for alternating current circuits and DC (V—) for direct current. Using the wrong mode can lead to inaccurate readings or damage.
Up
|
What’s the difference between analog and digital multimeters? |
Analog multimeters use a moving needle to show readings.
Digital multimeters (DMMs) display numeric values on an LCD screen, offering greater accuracy, readability, and additional features like auto-ranging and data hold.
Up
|
What is a digital multimeter (DMM)? |
|
A digital multimeter is an electronic measuring instrument that combines several measurement functions in one unit — typically voltage, current, and resistance. Advanced models also measure capacitance, frequency, temperature, and continuity.
Up
|
How is the AM-1060 powered? |
It operates on a 9V battery (6F22 type) and includes an auto power-off feature to conserve energy.
Up
|
What makes the AM-1060 different from a standard multimeter? |
The AM-1060 offers True RMS measurement, auto-ranging, data hold, relative measurement, and max/min recording features, providing laboratory-grade accuracy for professional and educational use. It also includes USB connectivity for PC data logging, which many standard multimeters lack.
Up
|
What is the AM-1060 Digital Multimeter used for? |
|
The AM-1060 is a high-precision digital multimeter designed for electrical, electronic, and laboratory applications. It measures DC/AC voltage and current, resistance, capacitance, frequency, temperature, and includes continuity and diode testing — all in one compact instrument.
Up
|
How to measure resistance with Aktakom AM-1171 multimeter? |
Note:
- When measuring capacity and taking diode test the power supply should be disconnected from the circuit under test, and all of the capacitors in it should be discharged. The measurement of large capacity may take a long time.
- If in the capacity measurement mode you mistakenly input voltage to the device it will make automatic protection system work that will save Aktakom AM-1171 from damage.
- Any voltage in the circuit when measuring resistance may cause inaccurate measurement. If such voltage exceeds 250 V it may cause the device damage.
- At 600 Ohm range you should at first measure the wire resistance and after that, using the received value, correct the sequent measurement.
- If there is open circuit connected to AM-1171 or inversed polarity diode you will see “OL” symbol on the display.
- After the measurement process is completed you need to disconnect the device from the circuit under test immediately.
Do the following:
- Press
 button which helps to switch the measurement modes specified above. button which helps to switch the measurement modes specified above.
- Connect the red and black test leads to «VΩHz» and «COM» accordingly.
- When measuring resistance, capacity and making continuity test you need to connect the test leads to the outputs of the circuit or element under measurement. When making the diode test you need to connect the red test lead tip to the positive diode output and the black one – to the negative output.
Note: In these modes RANGE, MAX/MIN, HOLD buttons are active.
Up
|
How to measure frequency with Aktakom AM-1171 multimeter? |
Do the following:
- Press Hz/°C/°F – Aktakom AM-1171 multimeter will enter into the frequency measurement mode.
- Connect the test leads to "VΩHz" and "COM" accordingly.
- Connect the test leads in parallel to the source of the signal under measurement and see the readings on the display.
In the AC voltage measurement mode the switching between frequency measurement functions and duty factor is made with Hz/DUTY button. When measuring frequency the analog scale is not displayed.
Note: after the measurement process is completed you need to disconnect the device from the circuit under test immediately.
Up
|
How to measure temperature with Aktakom AM-1171 multimeter? |
Take the following steps:
- Press “Hz/°C/°F” button for over 2 seconds, select temperature mode for Celsius measurement. Meanwhile, the temperature symbol will be displayed. Further press "Hz/°C/°F", it will be displayed in Fahrenheit. The procedure repeats in the same order. To exit the temperature measurement mode press "Hz/°C/°F" button for over 2 seconds again .
- Connect the test leads to "VΩHz" and "COM" accordingly.
- Put the thermocouple-sensing element on the surface of the object under test. See the readings on the display.
- Without the thermocouple Aktakom AM-1171 multimeter displays the temperature of the inner contacts.
Note: Do not input voltage in the temperature measurement mode.
Up
|
How to deactivate Auto Power Off function of AKTAKOM AM-1009 multimeter? |
To deactivate Auto Power Off function you need to press POWER/APO button once, at the same time “APO” will disappear from the display. To activate Auto Power Off function press POWER/APO button again.
Up
|
Does AKTAKOM AM-1009 multimeter have auto power off function? |
Yes, it does. There is Auto Power Off function in AM-1009: the device power automatically goes off if you do not use the device within 15 minutes. One minute before the device is powered off it will make 4 sound signals, and right before the powering off – one more long signal. To start the operation again after Auto Power Off you need to press any button.
Up
|
How to select the measurement range on AKTAKOM AMM-1081 multimeter? |
|
Press Range button on AKTAKOM AMM-1081 multimeter and you will be able to select the required range manually.
Up
|
What does «Smart» indicator mean in the like mode of AKTAKOM AMM-1081 multimeter? |
«Smart» indicator means AKTAKOM AMM-1081 is in automated mode to define the function under measurement.
To select the function under measurement manually press Select button (at this moment «Smart» indicator will be off).
Up
|
How to deactivate Auto Power Off function of AKTAKOM AMM-1048 multimeter? |
Auto Power Off function can’t be disabled in AMM-1048 multimeter.
Up
|
Does AKTAKOM AMM-1048 multimeter have auto power off function? |
Yes, it does. There is Auto Power Off function in AMM-1048: the device power automatically goes off if you do not use the device within 15 minutes. To start the operation again press any button.
Up
|
Does AKTAKOM AM-1006 multimeter have auto power off function? |
|
No, there is no such a function in AM-1006.
Up
|
Does AKTAKOM AM-1109 multimeter have auto power off function? |
No, there is no such a function in AM-1109.
Up
|
How to deactivate Auto Power Off function of AKTAKOM AMM-1081 multimeter? |
Auto Power Off function can’t be disabled in AMM-1081 multimeter.
Up
|
Does AKTAKOM AMM-1081 multimeter have auto power off function? |
Yes, it does. There is Auto Power Off function in AMM-1081: the device power automatically goes off if you do not use the device within 3 minutes. The device will make 3 short sound signals and before powering off – one more long signal. To start the operation again press any button.
Up
|
How to deactivate Auto Power Off function of AKTAKOM AMM-1061 multimeter? |
Auto Power Off function can’t be disabled in AMM-1061 multimeter.
Up
|
Does AKTAKOM AMM-1061 multimeter have auto power off function? |
Yes, it does. There is Auto Power Off function in AMM-1061: the device power automatically goes off if you do not use the device within 30 minutes. If you’d like to switch the device on after it was automatically powered off press any button or use the rotary switch.
Up
|
How to deactivate Auto Power Off function of AKTAKOM AM-1060 multimeter? |
To deactivate Auto Power Off function press RS232 button.
Up
|
Does AKTAKOM AM-1060 multimeter have auto power off function? |
Yes, it does. There is Auto Power Off function in AM-1060: the device power automatically goes off if you do not use the device within 15 minutes. 30 seconds before the device powers off it will make 3 short sound signals and before powering off – one more long signal. To start the operation again press any button or use the rotary switch.
Up
|
Does AKTAKOM AMM-3031 LCR meter have auto power off function? |
Yes, it does. There is Auto Power Off function in AMM-3031: the device power automatically goes off if you do not use the device within 15 minutes. 1 minute before the device powers off it will make a sound signal and it will also make one more signal right before getting into energy saving mode. To start the operation again press any button or use the rotary switch.
Up
|
How to deactivate Auto Power Off function of AKTAKOM AM-1108 multimeter? |
Auto Power Off function can be deactivated in the device setting menu. To enter the setting mode power on AM-1108 keeping RANGE button pressed. In the setting mode the parameter name appears in an additional area of the screen and the value of this parameter can be seen in the main screen area. To change the parameter press RANGE, to save the changed value press REL (SAVE sign in the main screen area will confirm that the parameter has been successfully saved). To exit the setting mode simply power the device off. Auto Power Off time can be adjusted at the range from 0 to 60 minutes with 10 minutes step. Set it to 0 and the multimeter won’t power off automatically.
Up
|
Does AKTAKOM AM-1108 multimeter have auto power off function? |
Yes, it does. There is Auto Power Off function in AM-1108: the device power automatically goes off if you do not use the device within 10 minutes. If you’d like to switch the device on after it was automatically powered off press any button or use the rotary switch.
Up
|
There are problems when connecting AKTAKOM AM-1118 multimeter, what should be done? |
There can be several reasons and solutions accordingly:
- Installation failure / wrong installation of the software
Reinstall the program and the driver, restart the PC and reset the software once again;
- Error has been caused by the operation system
Try connecting the device to another PC, if it operates properly the problem is connected with your PC, if you see the same error the device requires service repair.
- Wrong driver on the CD (the CD contains wrong optical cable driver)
Download and install free USB to Serial Bridge Prolific PL-2303 converter driver. Afterwards optical cable from AM-1118 set should be successfully detected by the OS when connecting to USB.
Up
|
Does AKTAKOM AM-1118 multimeter have auto power off function? |
Yes, it does. There is Auto Power Off function in AM-1118: the device power automatically goes off if you do not use the device within 30 minutes. 1 minute before the device powers off it will make 3 short sound signals and before the powering-off – one more long signal. If you’d like to switch the device on after it was automatically powered off press HOLD/LIGHT button or use the rotary switch. When you switch on the mode of the measurement data transfer to PC the device will automatically power off in one hour.
Up
|
How to deactivate Auto Power Off function of AKTAKOM AM-1018 multimeter? |
Auto Power Off function can’t be disabled in AM-1018 multimeter.
Up
|
Does AKTAKOM AM-1018 multimeter have auto power off function? |
Yes, it does. There is Auto Power Off function in AM-1018: the device power automatically goes off if you do not use the device within 15 minutes. If you’d like to switch the device on after it was automatically powered off press any button or use the rotary switch.
Up
|
How to deactivate Auto Power Off function of AKTAKOM AMM-1028 multimeter? |
Auto Power Off function can’t be disabled in AMM-1028 multimeter.
Up
|
Does AKTAKOM AMM-1028 multimeter have auto power off function? |
Yes, it does. There is Auto Power Off function in AMM-1028: the device power automatically goes off if you do not use the device within 15 minutes. Before the multimeter powers off it will make 3 short sound signals and before the powering-off – one more long signal. If you’d like to switch the device on after it was automatically powered off press any button or use the rotary switch.
Up
|
How to deactivate Auto Power Off function of AKTAKOM AMM-1032 multimeter? |
Auto Power Off function can’t be disabled in AMM-1032 multimeter.
Up
|
Does AKTAKOM AMM-1032 multimeter have auto power off function? |
Yes, it does. There is Auto Power Off function in AMM-1032: the device power automatically goes off if you do not use the device within 15 minutes. Press any button to start the operation again.
Up
|
How to deactivate Auto Power Off function of AKTAKOM AMM-1009 multimeter? |
Auto Power Off function can’t be disabled in AMM-1009 multimeter.
Up
|
Does AKTAKOM AMM-1009 multimeter have auto power off function? |
Yes, it does. There is Auto Power Off function in AMM-1009: the device power automatically goes off if you do not use the device within 15 minutes. Press any button to start the operation again.
Up
|
How to deactivate Auto Power Off function of AKTAKOM AMM-1008 multimeter? |
Auto Power Off function can’t be disabled in AMM-1008 multimeter.
Up
|
Does AKTAKOM AMM-1008 multimeter have auto power off function? |
Yes, it does. There is Auto Power Off function in AMM-1008: the device power automatically goes off if you do not use the device within 15 minutes. Press any button to start the operation again.
Up
|
How to deactivate Auto Power Off function of AKTAKOM AMM-1063 multimeter? |
Auto Power Off function can’t be disabled in AMM-1063 multimeter.
Up
|
Does AKTAKOM AMM-1063 multimeter have auto power off function? |
Yes, it does. There is Auto Power Off function in AMM-1063: the device power automatically goes off if you do not use the device within 10 minutes. Before the multimeter powers off it will make 3 short sound signals and before the powering-off – one more long signal. Press any button to start the operation again.
Up
|
How to deactivate Auto Power Off function of AKTAKOM AMM-1139 multimeter? |
Auto Power Off function can be disabled through AKTAKOM AMM-1139 menu. Keep RANGE button pressed within 2 seconds, afterwards the device will enter parameter setting mode. Then use the same button to select the next parameter in the list:
- Sound signal for the upper limit;
- Sound signal for the lower limit;
- Auto Power Off time;
- Sound signal switching off
- Backlight work time.
For parameter selection use the following buttons: ←, +, -, →.
By pressing SETUP button, switch between the parameters. After you get the end of the list the device will get back to test mode with changed parameters saving. If you press EXIT button to exit the device setting mode the changed settings won’t be saved.
Up
|
Does AKTAKOM AMM-1139 multimeter have auto power off function? |
Yes, it does. There is Auto Power Off function in AMM-1139: the device power automatically goes off if you do not use the device within 15 minutes. 1 minute before the multimeter powers off it will make 3 short sound signals and before the powering-off – one more long signal.
Up
|
How to deactivate Auto Power Off function of AKTAKOM AMM-1062 multimeter? |
Auto Power Off function can’t be disabled in AMM-1062 multimeter.
Up
|
Does AKTAKOM AMM-1062 multimeter have auto power off function? |
Yes, it does. There is Auto Power Off function in AMM-1062: the device power automatically goes off if you do not use the device within 15 minutes.
Up
|
How to deactivate Auto Power Off function of AKTAKOM AM-1142 or AM-1152 multimeter? |
To deactivate Auto Power Off function keep REL 2 button pressed for 2 seconds. If you use RS-232 interface to output the readings the multimeter won’t be automatically powered off.
Up
|
Does AKTAKOM AM-1142 or AM-1152 multimeter have auto power off function? |
There is Auto Power Off function in AM-1142 and AM-1152 multimeters: the device power automatically goes off if you do not use the device within 30 minutes. 1 minute before the multimeter powers off it will make 3 sound signals and before the powering-off – several more signals. If you’d like to switch on the device after it was automatically powered off press any of SELECT, RANGE, MAX/MIN, HOLD buttons or turn the rotary switch.
Up
|
How to deactivate Auto Power Off function of AKTAKOM AMM-1130 multimeter? |
To deactivate Auto Power Off function you need to press PC-LINK button. In the device-to-PC connection mode auto power off doesn’t work.
Up
|
Does AKTAKOM AMM-1130 multimeter have auto power off function? |
Yes, it does. There is Auto Power Off function in AMM-1130: the device power automatically goes off if you do not use the device within 15 minutes. 30 seconds before the multimeter powers off it will make 3 sound signals and before the powering-off – one more long signal. To start the operation again after it was automatically powered off it’s necessary to press FUNC button or to turn the rotary switch.
Up
|
How to deactivate Auto Power Off function of AKTAKOM AM-1171 multimeter? |
To deactivate Auto Power Off function keep REL 2 button pressed for 2 seconds (“APO” indication will disappear from the display).
Up
|
Does AKTAKOM AM-1171 multimeter have auto power off function? |
Yes, it does. There is Auto Power Off function in AM-1171: the device power automatically goes off if you do not use the device within 10 minutes. 1 minute before the multimeter powers off it will make 3 sound signals and before the powering-off – several more signals. If you’d like to switch the device on after it was automatically powered off press any of SELECT, RANGE, MAX/MIN, HOLD or POWER keys.
Up
|
How to disable Auto Power Off function of AKTAKOM AM-1019 multimeter? |
To deactivate Auto Power Off function keep FUNC button pressed when you power on the device.
Up
|
Does AKTAKOM AM-1019 multimeter have auto power off function? |
Yes, it does. There is Auto Power Off function in AM-1019: the device power automatically goes off if you do not use the device within 15 minutes. Before the multimeter powers off it will make 3 sound signals and afterwards one more long signal. If you’d like to switch the device on after it was automatically powered off press any of HOLD, FUNC, RANGE, Hz/DUTY or REL buttons.
Up
|
Does AKTAKOM AM-1016 multimeter have auto power off function? |
No, AM-1016 multimeter doesn’t have this function.
Up
|
How to disable Auto Power Off function of AKTAKOM AM-1083 multimeter? |
Auto Power Off function can’t be deactivated in this very model.
Up
|
Does AKTAKOM AM-1083 multimeter have auto power off function? |
Yes, it does. There is Auto Power Off function in AM-1083: the device power automatically goes off if you do not use the device within 20 minutes. To start the operation again press POWER button twice.
Up
|
How to disable Auto Power Off function of AKTAKOM AM-1038 multimeter? |
|
To deactivate Auto Power Off function of AM-1038 you need to keep WAKE button pressed when you power on the multimeter.
Up
|
Does AKTAKOM AM-1038 multimeter have auto power off function? |
Yes, it does. There is Auto Power Off function in AM-1038: the device power automatically goes off if you do not use the device within 15 minutes. To start the operation again after Auto Power Off you need to press WAKE button or turn the rotary switch.
Up
|
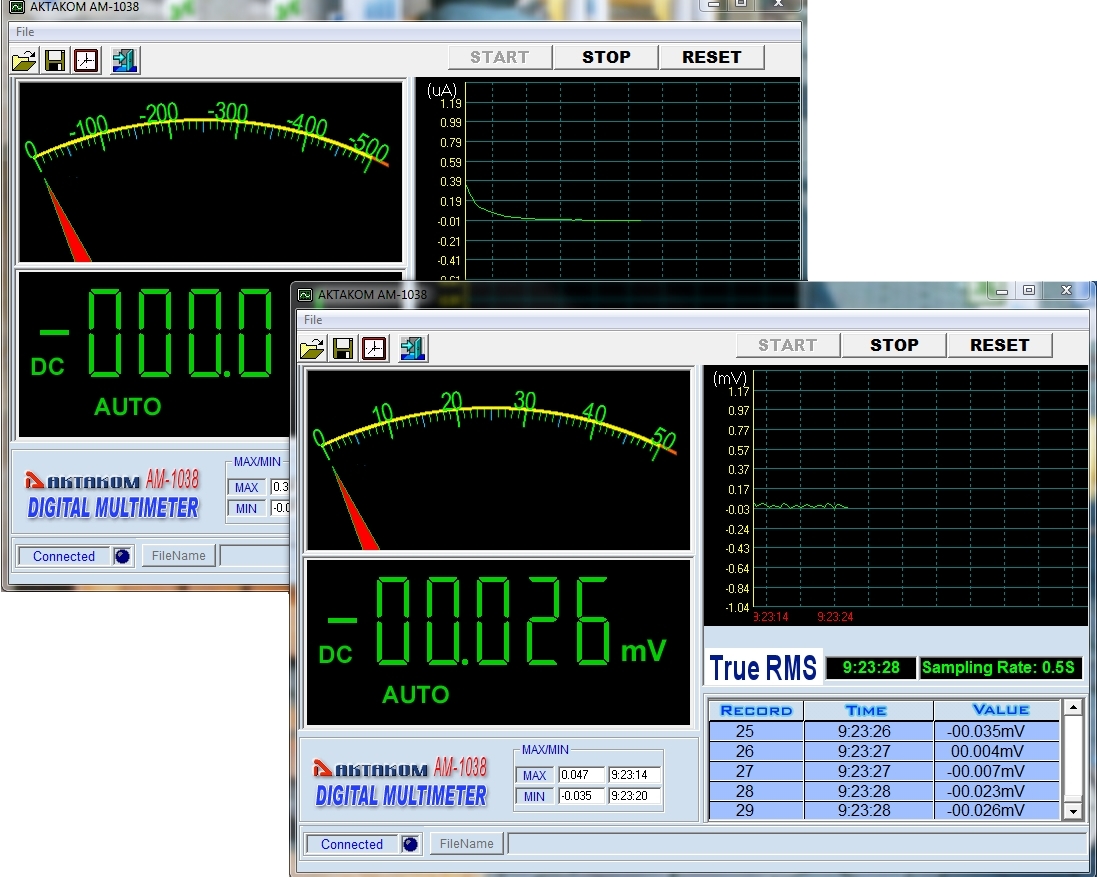
Is it possible to run several software copies of AM-1038 simultaneously and independently on one PC? |
Yes, it's possible!
AM-1038 software recognizes the device connection port automatically. If you connect several devices to different USB-ports of one PC (activating PC-Link mode on each of them by keeping HOLD button pressed), run a respective number of the Software copies and press START button one by one in each Software you will see an independent data collection of the appropriate device.
The below screenshot demonstrates the example of simultaneous operation of 2 devices (one of them is in “µA” mode, the other one – in “mV” mode)
Up
|
There are problems when connecting AKTAKOM AM-1038 multimeter, what should be done? |
There can be several reasons and solutions accordingly:
- Installation failure / wrong installation of the software
Reinstall the program and the driver, restart the PC and reset the software once again;
- Error has been caused by the operation system
Try connecting the device to another PC, if it operates properly the problem is connected with your PC, if you see the same error the device requires service repair.
- Wrong driver on the CD (the CD contains wrong optical cable driver)
Download and install free USB to Serial Bridge Prolific PL-2303 converter driver. Afterwards optical cable from AM-1038 set should be successfully detected by the OS when connecting to USB.
Up
|
Does AKTAKOM AM-1152 multimeter have galvanic isolation when connecting to the PC? |
Up
|
How to measure maximum and minimum values using ABM-4081 multimeter? |
Pressing the MAX/MIN key the meter will enter the maximum value, minimum value record state and display the maximum value on the second display zone. The meter measures the present value and continuously judges if it is necessary to update the maximum or minimum value. Pressing the MAX/MIN key again it is possible to select displaying the minimum value. Under the maximum and minimum value record state, press the MAX/MIN key for two seconds and then release it, the meter will exit the MAX/MIN record state.
Up
|
How to measure peak value using ABM-4081 multimeter? |
Press the SHIFT + MAX/MIN the meter will enter the peak mode. The meter provides a peak hold function to capture the real peak value for voltage or current measurement mode. In a case of a 1V sine wave input voltage, the peak hold function gets a maximum peak value of 1.414V and minimum peak value of -1.414V ideally. Press SHIFT + MAX/MIN under the peak mode to exit the peak mode. Peak mode is unavailable, when at the DCmV / AC mV / OHM / DIODE / CONT / RTD / TC / frequency / capacitance measurement.
Up
|
How to measure DC Ampere/AC Ampere using ABM-4081 multimeter? |
The measurement range of DC current is 0.1mA~10A, and the measurement methods are as follows:
- Turn on the power switch and press A button. (SHIFT + A =AC Ampere)
- Insert the red testing line into the A input end and the black testing line into the COM input end.
- Turn off the power of the measured circuit, connect the red and black probes to the measured circuit in a serial way and then turn on the power of the measured circuit again.
- Read the measured value from the main display area. During the DC measurement, if it displays as positive, it means the current is flowing into the meter from the red testing line, while it displays as negative, it means the current is flowing into the meter from the black testing line. During the AC measurement the secondary display area is the signal’s frequency. While displaying OL during manual range measurement, it is necessary to select a larger range. When OL displaying under the maximum range, it indicates the current is larger than 10A.
Warning: Estimate the current before measurement, not to exceed 11A current of the fuse
Up
|
How to measure DC μA/mA or AC µA/mA using ABM-4081 multimeter? |
The measurement range of DC/AC current is 0.01μA~6000µA and the measurement methods are as follows:
- Turn on the power switch and press μA/mA button (SHIFT +μA/mA=AC μA/mA).
- Repeat step 1, may change the µA to mA.
- Insert the red testing line into the mA/μA input end and the black testing line into the COM input end.
- Turn off the power of the measured circuit, connect the red and black probes to the measured circuit in serial way and then turn on the power of the measured circuit.
- Read the measured value from the main display area. If it displays as positive during the DC measurement, it means the current is flowing into the meter from the red testing line, while it displaying as negative, it means the current is flowing into the meter from the black testing line. If it displays as OL, it means current exceeding range. When performance AC µA/µA measurement, the secondary display area is the signal’s frequency. While displaying OL during manual range measurement, it is necessary to select a larger range. When OL displaying under the maximum range, it indicates the resistor is larger than 600mA/6000µA.
Warning: Estimate the current before measurement, not to exceed 0.63A current of the fuse.
Up
|
How to measure capacitance using ABM-4081 multimeter? |
The measurement range of capacitance is of 0.1pF~60mF and the measurement methods are as follows:
- Turn on the power switch and press SHIFT + Hz% button.
- Insert the red and black testing lines into the VΩHz input end and the COM input end respectively.
- If exists voltage in the capacitor, connect the two ends of the capacitor for a short time to discharge.
- Connect the red and black probes to the two ends of the capacitor, if the measured capacitor is heteropolar, it is necessary to connect the red probe to the positive polarity of the capacitor and the black probe to its negative polarity.
- Read the capacitance from the display screen. While displaying OL during manual range measurement, it is necessary to select a larger range. When OL displaying under the maximum range, it indicates the capacitance value > 63mF, then meter will display OL, while capacitance value < 0.1pF, it will display zero.
- It is possible to select range manually by pressing the RANGE key.
Notes: When performing measurement on 600μF...63000μF capacitor, in order to ensure measurement accuracy the meter takes a relative long time to discharge capacitor, so it is relatively slow in refreshing the measured value. In addition, not to perform Capacitance measurement on a circuit board on which there are other parallel devices, for that may leads to very large error.
Up
|
How to measure resistance, continuity, diode using ABM-4081 multimeter? |
The measurement range of diode is of 0~2.2V.
The measurement range of resistance is of 0~60MΩ.
The measurement range of continuity is of 0~600Ω.
The measurement methods are as follows:
- Turn on the power switch and press Ω
 to switching Resistance / Continuity / Diode. to switching Resistance / Continuity / Diode.
- Insert the red testing line into the VΩHz end and the black testing line into the COM end.
- For the resistance measurement, connect the red and black probes to the two ends of resistor and read the resistance value from the main display area. While displaying OL during manual range measurement, it is necessary to select a larger range. When OL displaying under the maximum range, it indicates the resistor is larger than 60MΩ. As for the continuity measurement, connect the red and black probes to the two measured points respectively. In case of the resistance between the two points being less than about 50Ω~60Ω, the buzzer will sound while the display screen displaying the value of resistance. If OL displaying, it indicates the resistance between the two points is larger than 600Ω. As for the Diode measurement connect the red probe to the positive polarity of the diode and the black probe to its negative polarity, while the display screen will display the forward voltage drop. Connect the black probe to the positive polarity of the diode and the red probe to its negative polarity, if OL displaying on the display screen, it indicates the backward resistance of the diode being normal, while OL not displaying, it indicates that the drop of diode.
Notes: In case of performing diode / resistance / continuity test on circuit board, it is necessary firstly to turn off the power of the circuit board and then perform the measurement. As there may be other parallel circuits, so the displayed value of test is not surely the results listed in items 3.
Up
|
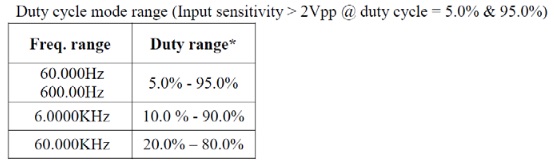
How to measure (logic) frequency and duty ratio using ABM-4081 multimeter? |
The frequency range is 4Hz~60MHz, while the duty ratio measurement range and method are as follows:
- Turn on the power switch and press Hz% button.
- Insert the red testing line into the VΩHz end and the black testing line into the COM end.
- Connect the red testing line to high logic level, the black one to low logic level.
- Read the measured value from the main display area. The secondary display area is the signal’s duty cycle. If the frequency of the measured signal is lower than the meter’s measurement range, the reading will be displayed as zero.
- By pressing the RANGE key it is possible to select range manually. While displaying OL during manual range measurement, it is necessary to select a larger range. When OL displaying under the maximum range, it indicates the frequency exceeding 60MHz, so it is necessary to remove both the red and black probes from the measured circuit immediately.
Notice: Duty measurement can not be measured over 60.000kHz.
Up
|
How to connect test leads to IP67 waterproof instruments? |
Devices made in accordance with the requirements of IP67 (Waterproof) have tight test lead jacks. It is important that the insertion of the test leads is performed without gaps. The edges of test leads have special grooves for sealing against water.

Therefore the test leads should be inserted with a lot of effort (pushed forcefully into the jacks of the instrument) in order to achieve tight connection. Otherwise the test leads will not be securely connected to the jacks of the measuring instrument.

Tight connection of the test leads to the instrument is an essential condition for all Waterproof measurements in accordance with the terms of IP67. To verify the correct connection mode, set rotary switch to the continuity mode and press the MODE button.

Up
|
How to use PC-Link mode? |
The meter has serial data output function. It can be connected with PC by USB interface, so the measured data can be recorded, analyzed, processed and printed by PC. Before use this function, you need install the PC-Link software and USB driver in your PC.
- Make sure the two Install USB driver and Install software files in the attached CD successfully installed before any measurement.
- After turning on the meter, press the SHIFT key and the SHIFT symbol will appear on LCD. Then press the RANGE key to enter PC-Link mode, the symbol “PC-LINK” will appear on LCD, and the serial data output function is active.
- Connect the meter’s OPTICAL PORT and computer USB port with the USB line.
- Select the default sampling rate or you can select other desired sampling rate.
- Now press the Start in the PC-LINK SOFT to measure and view the synchronic data or graph in the software interface.
- To disable the serial data output function, press SHIFT and then press RANGE again.
Up
|
How to disable autopower off function and enable PCLINK function? |
Do the following:
- Turn off meter Power.
- Keep press "Select" and "Hz" key, do not release.
- Turn on meter Power.
- After 2 seconds release "Select" key (Disable Autopower off function).
Up
|
How to use PC-Link application software with AM-1118 multimeter? |
Take the following steps:
- Make sure the meter is properly attached to the computer.
- Turn on the meter while pressing the Hz/Duty key to make PC-LINK function active.
- Run the multimeter’s PC-LINK program.
- Select the correct COM port and set the desired Sampling Rate.
- Click the "START" button on the interface of multimeter’s PC-LINK program.
- Measure the circuit with the meter.
- The reading on the meter should now be displayed on the computer synchronously.
Up
|
How DMM is designed (disassembled view) |
Front panel covers LCD, button board, rotary function switch gear and main plated circuit board:

*Rubber strip between the back and front chassis covers protects from water and dust.
Protective fuses are mounted near the inputs and sound buzzer is placed behind the LCD.
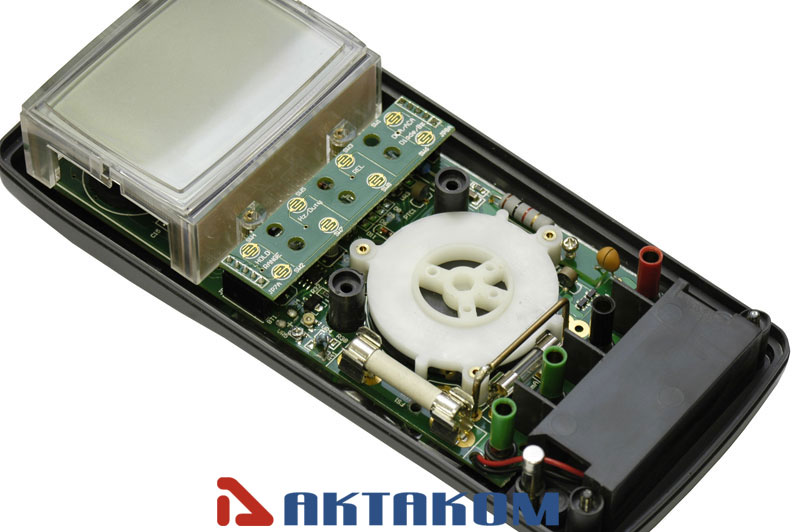
* There is also an extra fuse fixed at the buttom (for several models)
Up
|
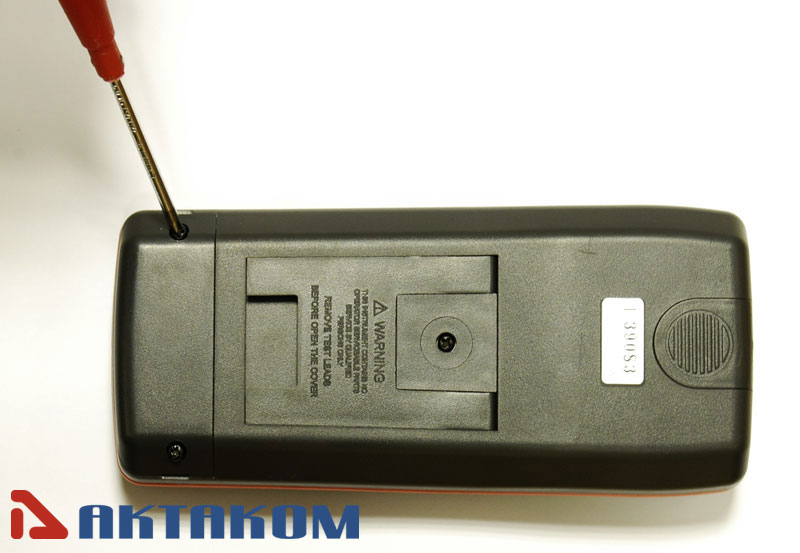
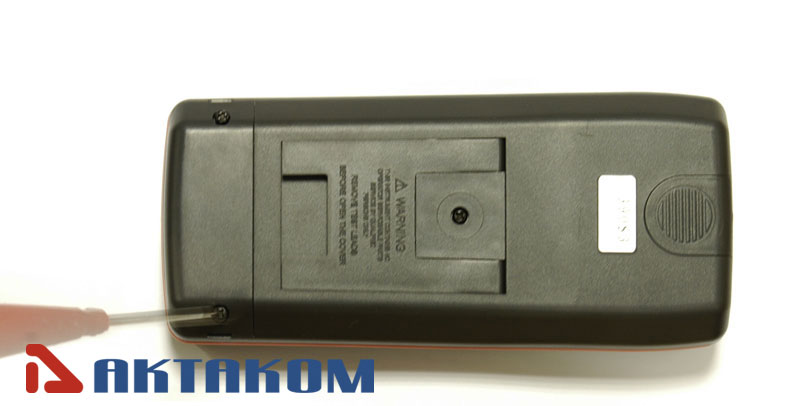
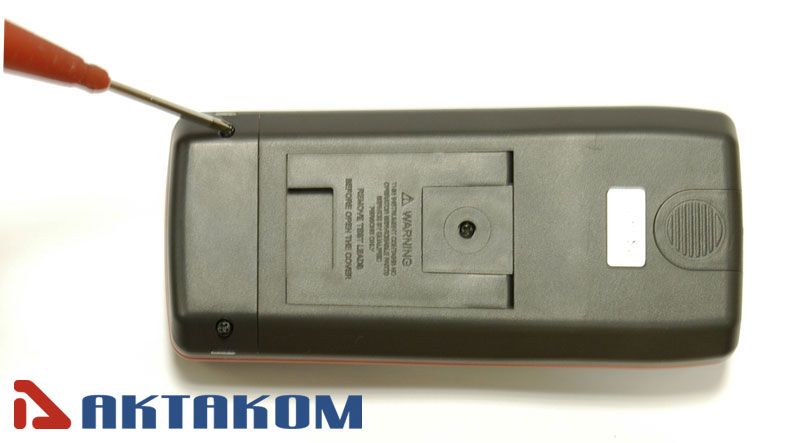
How to replace or install the batteries in AM-1060? |
When the batteries become exhausted or drop below the operating voltage, “BAT” indicator will appear in the LCD display. In this case the battery should be replaced, however in-spec. measurements may still be made for several hours after "Low battery indicator" appears before the instrument become inaccurate.
WARNING! To avoid electric shock, disconnect the test leads from any source of voltage before removing the battery cover.
"DC 1.5V" type AAA (e.g. AM-1060)
1. Open the battery cover by loosing the screws with the cross-point screwdriver
 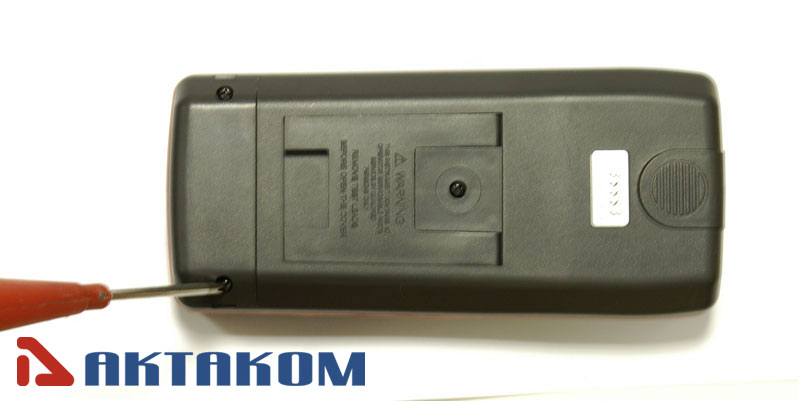 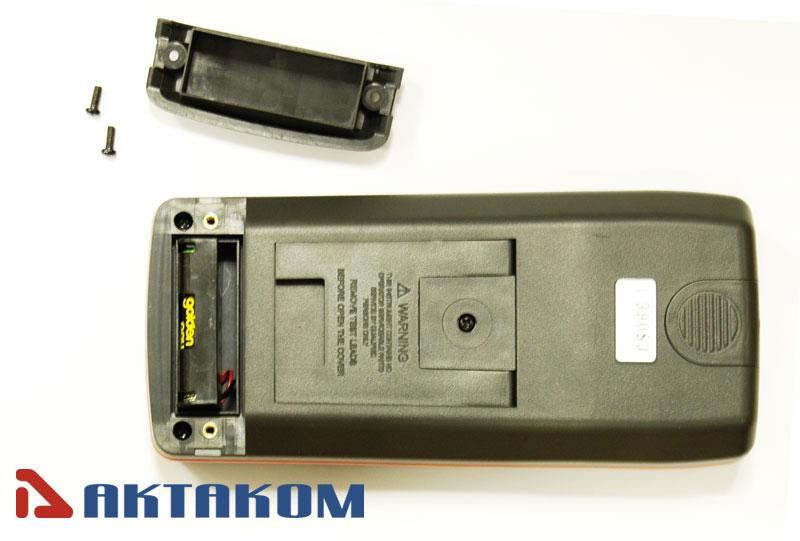
2. Carefully pull out the buttery carrier and take off the old batteries
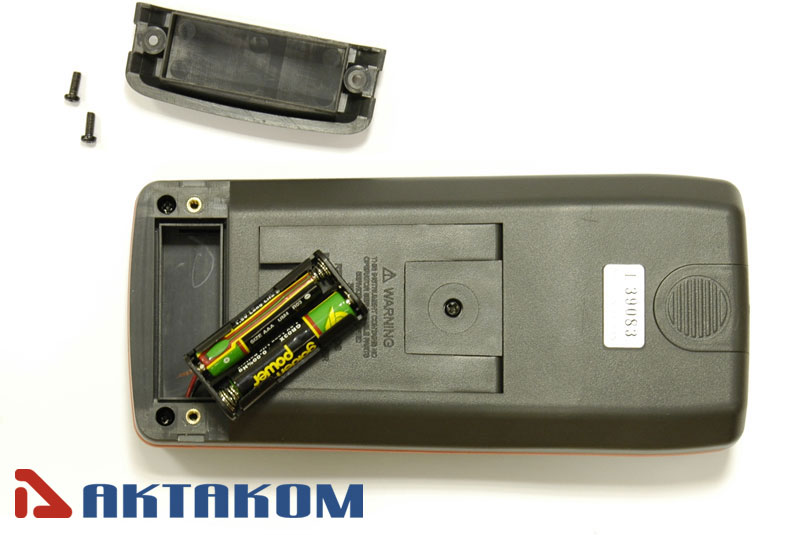 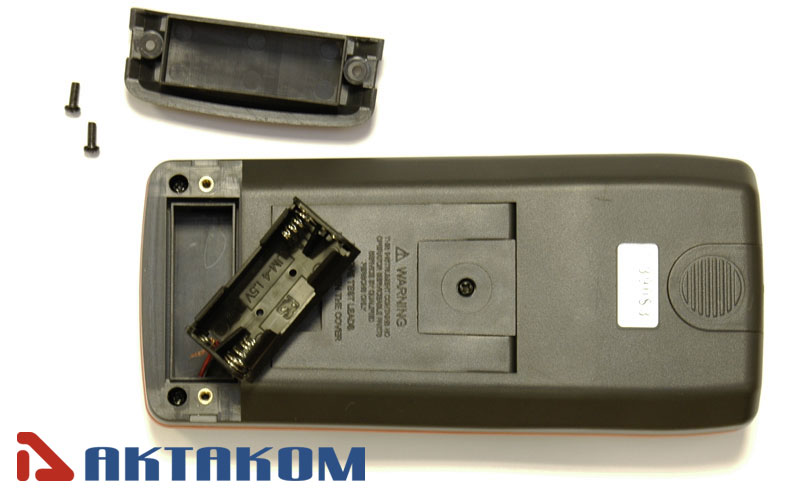
3. Plug the new batteries of the proper type in the holder and put it back
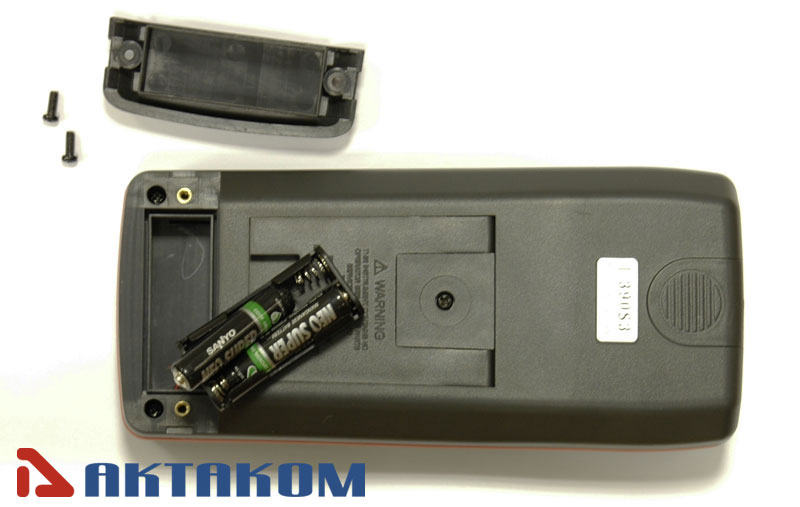 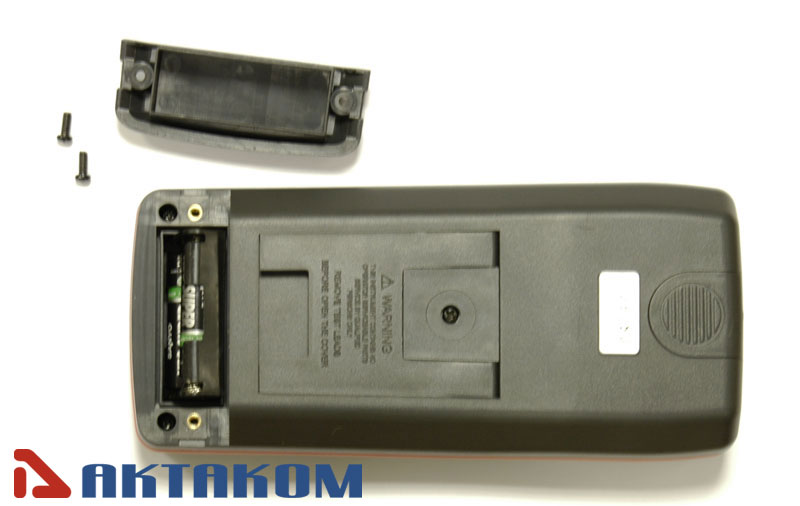
4.Close the battery cover and reinstate the cover
After completion make sure you don’t have any spare parts 
If you do find spare parts, you must start all over 
Up
|
|
|
