Depending on a destination shipping cost may vary. Free shipping for orders over $450 on items weighting under 20 lbs (certain restrictions apply!) See shipping page for international rates or contact sales@tmatlantic.com
In stock, 3 left
Description
Specifications
Accessories
Videos
Application
FAQ
Software
Descripción
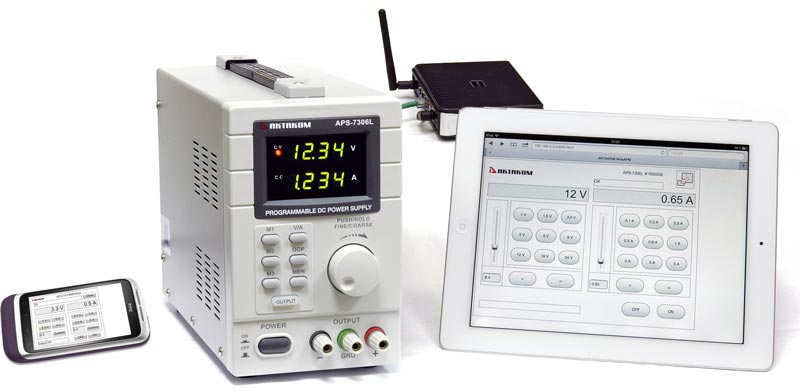
AKTAKOM APS-7306LS DC programmable power supply is designed to power radio technical equipment with stabilized voltage and current in repair process, laboratory research.
APS-7306LS DC Programmable power supply (analog of QJE QJ3005P) is the updated version of world famous Aktakom APS-7305L. In 2013 at Best in Test Award competition annually held by American Test & Measurement World APS-7305L became the winner in 2 categories at once «Power supply» and «Test Product of the Year»!
AKTAKOM APS-73xxLS series programmable DC power supplies differ from other similar devices by wide capabilities of local and remote control through AKTAKOM Power Manager software.
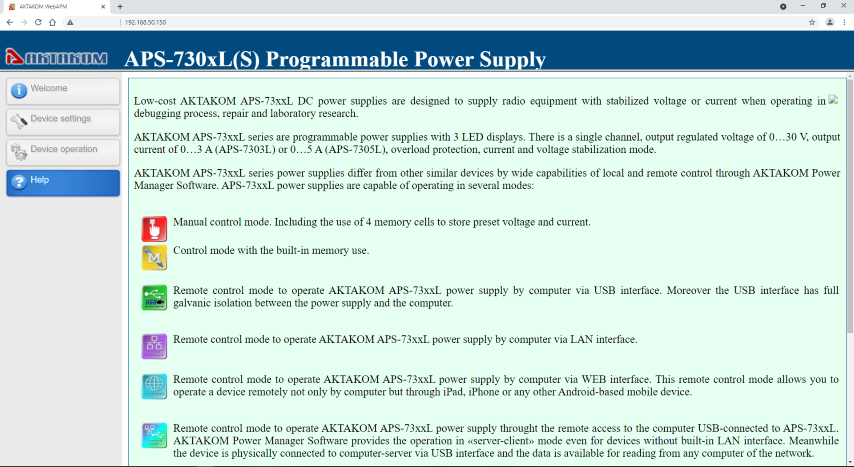
This power supply is capable of operating in several modes:
Manual control mode. Including the use of 4 memory cells to store preset voltage and current.
Control mode with the built-in memory use.
Remote control mode to operate APS-7306LS DC power supply by computer via USB interface through AKTAKOM Power Manager Software. Moreover the USB interface has full galvanic isolation between the power supply and the computer.
Remote control mode to operate AKTAKOM APS-7306LS programmable power supply by computer using LAN interface (Ethernet).
Available software development kit (SDK) for custom software applications for LabVIEW, C++, LabWindows-CVI and MS VB is designed to help users in developing their own applications for AKTAKOM power supplies.
Features
dual LED display for voltage and current
coarse and fine adjustments of voltage and current
protection mode: current limiting
output connectors: insulated safety plugs
organic glass front panel / other panels made of steel
memory:3 programmable memories
computer connectivity: pc remote control via USB or LAN
software included for Windows XP, Vista and W7, W8, W8.1 (32 bits + 64 bits)
"Absolute measurement error" service allows you to estimate the measurement accuracy considering uncertainty (error) in the absolute value. It's important if you take measurements at the range edge when the error value contributes to the value displayed on the device screen.
To get the value range it'd be enough to enter the estimate of the value under measurement into Value input field and to see the range of possible values taking all of the standardized errors into consideration.
Note: a point is used as a separator of the integer and fractional part.
Output voltage
Range
Resolution
Accuracy
Absolute error
Value-error
Value
Value+error
30 V
10 mV
±(0.5%+2 digits)
±0.16995 V
V
Output current
Range
Resolution
Accuracy
Absolute error
Value-error
Value
Value+error
5 A
1 mA
±(0.5%+10 digits)
±0.034995 A
A
Specifications
LED display: 2
Channel: 1
Output voltage: 0 30 V
Output current: 0 5 A
Output voltage inaccuracy: ±(0.5% + 20 mV)
Output current inaccuracy: ±(0.5% + 10 mA)
Voltage ripple & noise: 2 mV RMS.
Power supply: 220 V
Dimensions: 4.5x7.5x9.5 in / 115x190x240 mm
Weight: 11.7 lb / 5.3 kg
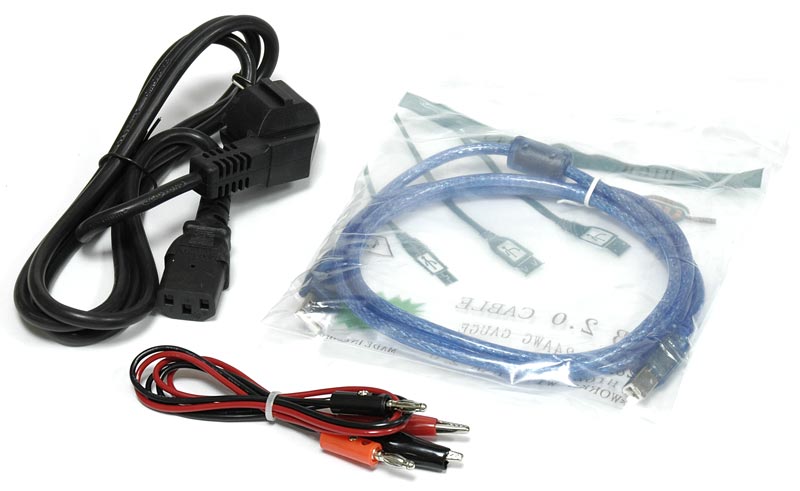
Included accessories:
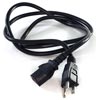
Power cord
USB cable
User manual
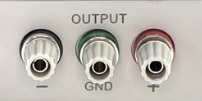
Connecting a Load
Connect the loads positive terminal to the red terminal + of the power supply.
Connect the loads negative terminal to the black terminal - of the power supply.
You can connect + or - terminal to the green earth terminal of the power supply to pin the voltage to 0V (earth potential) at that terminal.
If you leave the earth terminal unconnected, the output floats with respect to the ground.
Using the Power Supply in Constant Voltage Mode
If you want to use the power supply in constant voltage mode, you set up the desired output voltage between 0V and 30V. You also set up the desired current limit.
If the output current exceeds the limit, the power supply automatically goes into constant current mode.
Setting Voltage and Current
You can save 3 different voltage/current settings using the memory keys M1~M3.
Press the V/A key on the front panel to set the voltage. The voltage readout flashes.
For use in constant voltage mode: this is the desired constant voltage.
Turn the round adjustment knob until you reach approximately the desired voltage. Press the adjustment knob to select a digit in the voltage readout and turn the adjustment knob to fine-tune.
Press the V/A key again to set the current. The current readout flashes.
- For use in constant voltage mode: this is the desired current limit.
- For use in constant current mode: this is the desired constant current.
- If you enable overcurrent protection, the output switches off automatically if the current exceeds this value.
Turn the round adjustment knob until you reach approximately the desired current. Press the adjustment knob to select a digit in the current readout and turn the adjustment knob to fine-tune.
Press the memory key MEN again (or wait until the display to start flashing). Then press the m1-m3 button The settings are saved in the selected memory (the display stops flashing).
Using the Power Supply in Constant Current Mode
If you want to use the power supply in constant current mode: you set up the desired output current between 0A and 3A/5A. You also set up the desired voltage limit.
Switching the Power Supply On or Off
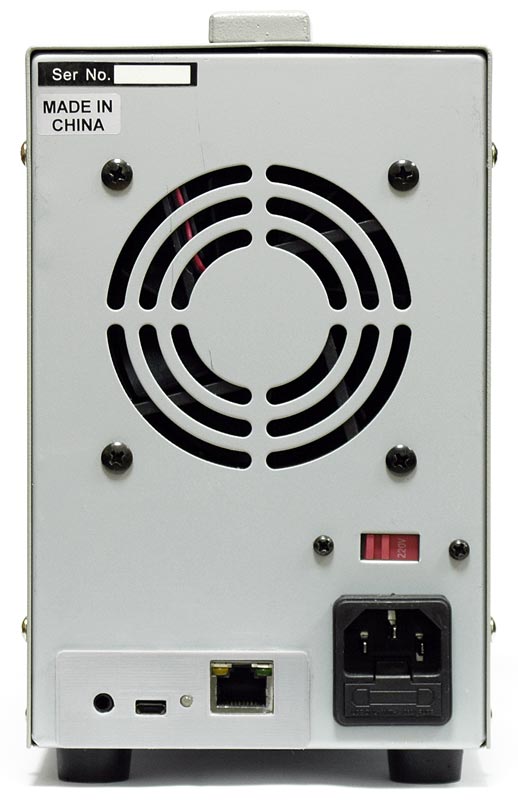
Connect the included power cord to the back of the device (see the pic. below) and plug the other end into a suitable, earthed power socket. Always connect the device to an earthed power socket!
Press the Power button on the front panel to switch the power supply on. At this moment, there is no output voltage or current on the output terminals.
Press the Power button to switch the power supply off.
Applying Voltage to the Load
Press the Off/On key on the front panel to apply the voltage to the load. The Output and C.V. indicators on the display light. The power supply works in constant voltage (CV) mode; the display now shows the actual output voltage and current.
If the current exceeds the set current limit, the power supply automatically goes into constant current (CC) mode. The C.V. indicator goes out and the C.C. indicator on the display lights
Press the Off/On key to switch the output off.
Recalling Settings
To recall one of the saved settings, press the corresponding memory key M1~M3, the corresponding voltage/current settings appear on the display.
Note: the output is switched off automatically when you press a memory key to recall a setup.
Can I store voltage and current values in the device memory?
AKTAKOM APS-7306 power supply has the ability to store 3 voltage and current values. The procedure for saving values is simple - enter, as described earlier, the voltage and current value, for example, 5 volts and 1 ampere and press the MEM and M1 button. Next, set the voltage and current value, for example, 12 volts and 2 amperes and press the MEM and M2 button. And for the 3rd time - set the voltage and current value, for example, 24 volts and 3.5 amperes and press the MEM and M3 button. See Video Tutorial for real life application Up
What software should I download to work with the APS-7306LS DC Programmable Power Supply?
To operate the APS-7306LS DC Programmable Power Supply, there are variety of software options available. Please refer to Compatible Software section on this page or visit Software for Power Supplies with Remote Control. Up
How do I connect the program software for APS-7306LS DC Programmable Power Supply?
First connect the USB cable to the computer and when the program starts, the program finds and connects itself to the the APS-7306LS. It is important to remember that the APS-7306LS will remain without manual control until the APS-7306LS is turned off and turned on again without connecting to a computer via USB. Up
What operating modes does the APS-7306(L/LS) DC Programmable Power Supply have?
The APS-7306(L/LS) power supply has two operating modes - voltage stabilization (CV) and current stabilization (CC). Voltage stabilization mode is the most commonly used operating mode. When we turn on the output button, in the voltage stabilization mode we see the set voltage value, and the current value will be equal to the measured one. If the current value constantly increases, then when the set maximum value is reached, power supply will automatically switch to current stabilization mode and reduce the output voltage.
Current stabilization mode is a mode in which the output voltage will be reduced so that the current does not exceed the set value. Therefore, you should always set the required maximum current value. If the required maximum current value is not set, then there will be no voltage at the output after pressing the Output button. Simply, when the current is set to zero, there should be zero voltage. We recommend that you always set the current to the minimum required. This will protect your electronic equipment from accidental short circuits during operation.
In APS-7306(L/LS) DC Programmable Power Supply, for ease of use, when setting typical values, you can memorize up to 3 voltage and current values.
Its easy to memorize the values - we enter the voltage and current values for example, 5 volts and 1 ampere and press the MEM and M1 button. Next, set a different value for voltage and current 12 volts and 2 amperes and press the MEM and M2 button and for the 3rd time - 24 volts and 3.5 amperes and press the MEM and M3 button.
The program has several blocks: the top block is setting up the program window and information buttons. You can close the clock, remove signatures, hide advertising. HELP can be called if necessary.
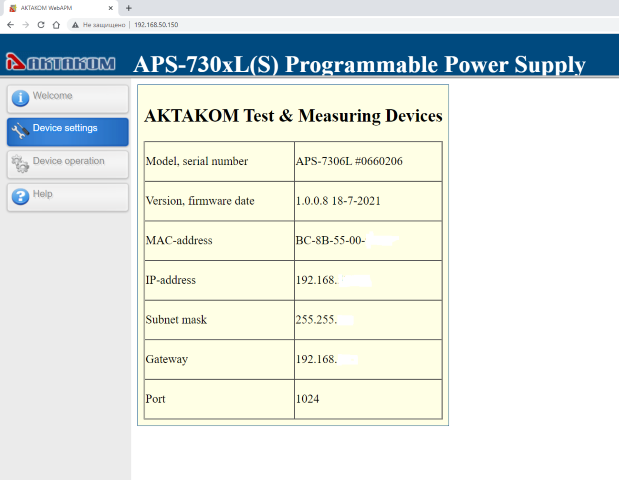
The Initialization Box shows the connected device - APS-7306LS.
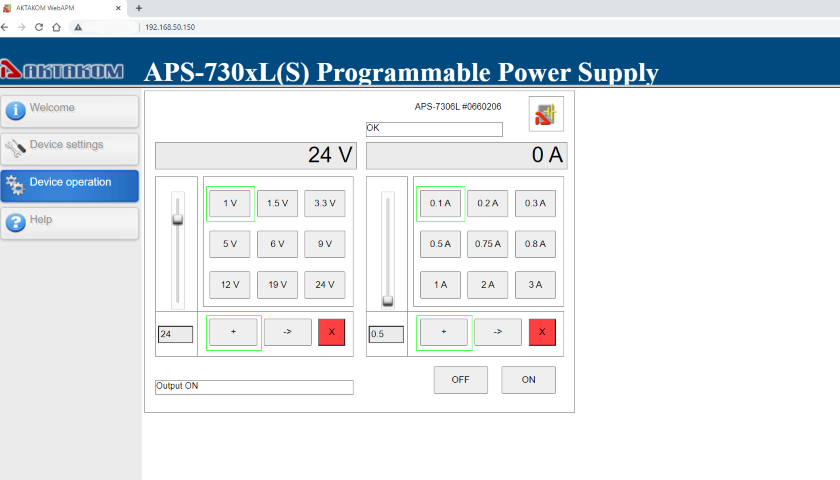
The Measurement Box is a main window and shows the voltage and current values produced by Aktakom APS-7306LS. This box shows the operating mode - voltage stabilization CV or current stabilization CC.
The SetUp Box has buttons for entering values - manual numbers, buttons - up - down, slider - right - left, and quick setting of pre-specified values.
To enter pre-set values, you need to use the gear buttons. A window will open containing a list of preset values. This list can be edited. You need to use the buttons - change the value of the current line, add a new value to the list or remove a value from the list.
At the bottom of the program window we have a large button - exit.
Pressing it connects the load to the power supply output.
How to connect to the sync input of AKTAKOM APS-3xxxLS and APS-7xxxLS power supplies with remote control?
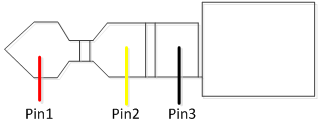
Sync input is a 2.5 mm audio jack stereo. The counterpart is a 2.5 mm audio jack plug. The scheme of this plug for synchronization signaling, see pic. 1.
Pic. 1
Pin1: Sync input
Pin2: Reserved
Pin3: Common wire
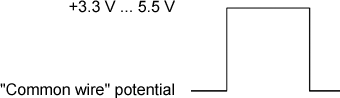
Parameters of the synchronization control pulse are shown in pic. 2.
Pic. 2
Note! In APS-7306LS power supply the signal of pin 2 input of the sync connector is also used to reset network settings to default. APS-3xxxLS power supplies do not use this signal.
We have added a number of new features to AKTAKOM Power Manager 21 Pro, trying to keep it simple and easy to use.
Template management
AKTAKOM laboratory power supplies can supply current with arbitrary parameters precisely set by the user, but in practice a number of parameters with fixed values are most often used - 1.5 Volts, 3.3, 9, 12 ... In APM21 Pro, you can make a list of your "favorite" values in advance voltage and current and then set them to the device with one click.
Command list management
Another important property of our power supplies is the ability to dynamically change the current output parameters. APM21 Pro can do this automatically. Set a list of commands to the device in advance, specifying the necessary parameters and time, save the list to a file and run it for automatic execution when you need it.
Customizable user interface
In addition to additional ways to control the device, the main window of the program also has a graph displaying the history of measurements received from the device. All this may seem redundant and cluttering for someone who plans to use the source for simple standard tasks. In this case, you can customize the user interface in a way that is convenient for you: hide and collapse all the blocks you dont need with special buttons and leave only the ones you need.
Saving data
If your lab's power supply is used for research, you may need to review instrument operation later. Therefore, we saved the history of events (displayed in the Protocol window) and measurement data (displayed on the graph in the main window) to a file.
What current protection do AKTAKOM power supplies use?
AKTAKOM power supplies use 2 types of protection.
In low end power supplies the current protection is provided mostly by "current stabilization" (CC) mode. When the load resistance decreases (or short circuit) the power supply reduces the output terminals voltage to the minimum level and remains in this condition until the load resistance appears on the terminals. When resistance appears, voltage (and current) will increase proportionally to the set value.
High end power supplies have also over current protection mode (or OCP mode) in addition to the current stabilization mode. OCP mode is activated regardless of current stabilization mode and allows you to set any current limit value at which the power supply will turn off the output terminals voltage. After the protection is activated the power supply terminals will stay off until some certain buttons on the device control panel are pressed, regardless of the load state.
Multi-channel power supplies use OCP options both for separate channels and for the total output current of the power supply.
Thus we may assume that devices without OCP mode use current stabilization mode for the current protection. In devices equipped with OCP mode the current protection works in the trigger mode.
However it should be noted that in both cases, when the protection is activated, the output terminals (and the load) are not galvanically isolated from the power supply.
May I use AKTAKOM power supplies to charge accumulators?
AKTAKOM power supplies cant be used for accumulator charging since it may cause the accumulator breakage (recharge, electrolyte boiling, extra pressure of the internal gas which will lead to the accumulator explosion). Accumulators should be charged with the current source which controls the accumulator voltage and regulates the charging current accordingly. When the required accumulator voltage is achieved such type of source simply stops the charging process, its name is a charging device.
How to see a device serial number in AKTAKOM Power Manager software?
The program automatically reads the serial numbers of all devices found. To detect the device open Settings window, go to Connection and Presets tab, select the right device type you need in the list of models and click Detect:
In the list of detected devices you will see all names and serial numbers of the devices found.
After you select one of the detected devices and connect it to the program its serial number will be displayed in the program main window title. Up
Compatible Software
AKTAKOM Power Manager 21 Professional (APM21 Pro)
AKTAKOM Power Manager 21 Professional (APM21 Pro) is an application software to control AKTAKOM Power Supplies from a computer using an USB cable or a local area network (LAN). This software offers some advanced features, such as control templates, command lists, customizable user interface, history of events.
APM21 Light (AKTAKOM Power Manager 21 Light) is an application software to control AKTAKOM Power Supplies from a computer using an USB cable or a local area network (LAN). This software provides control of output voltage and current in arbitrary (manual) mode as well as external trigger function (synchronization).
Aktakom Power Manager Max Pro is an application software to control AKTAKOM Power Supplies from a computer using an USB cable or a local area network (LAN). This software offers some advanced features, such as control templates, command lists, customizable user interface, history of events.
Aktakom Power Manager Max is an application software to control AKTAKOM Power Supplies from a computer using an USB cable or a local area network (LAN). This software provides control of output voltage and current in arbitrary (manual) mode as well as external trigger function (synchronization).
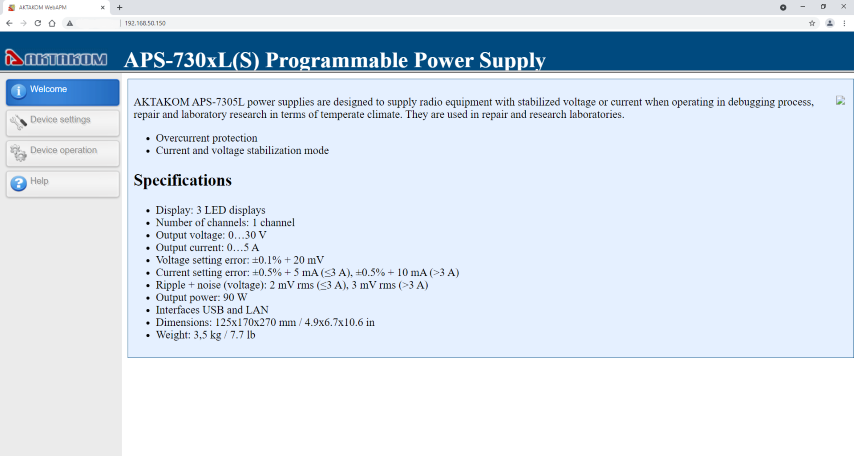
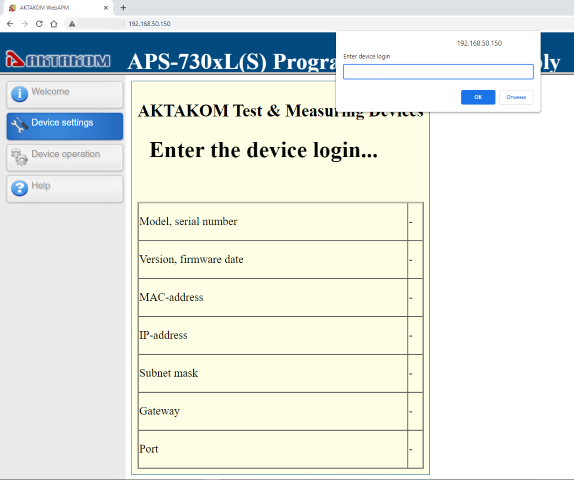
AULWebServer is a web interface based application (TCP/IP protocols). It allows remote control of an AKTAKOM instrument over the local area network (LAN).
AKTAKOM Net Configurator is designed to record and read the network settings data of AKTAKOM Universal Lab devices (supporting AULNet protocol). The application provides simple and convenient user interface to work with settings, they can be recorded into the file and read afterwards.
La fuente de alimentación programable Aktakom APS-7306LS esta diseñada para alimentar equipos técnicos de radio con corriente y tension estabilizados en proceso de reparación e investigación en laboratorios.
El presente modelo es perfecto para servicios de reparación y en laboratorios científicos y de investigación.
Características
doble LED monitor para la tension y corriente
ajustes amplios y finos para la tension y corriente
modo de protección: limitación de corriente
conectores de salida: enchunfles con aislamiento de seguridad
cristal de panel frontal orgánico / otros paneles hechos de metal
memoria:3 memorias programables
conectividad con computadora: pc control remoto via USB o LAN
software incluido para windows XP, W7, W8, W8.1, W10 (32 bits + 64 bits)


.jpg)


